Need some Instagram photo tips to make sure you get the perfect shot every time?
Look no further!
Here are 15 Instagram photo tips that I use pretty much everyday as a content creator and travel blogger.
I’ve compiled these tips over the past three years- and wish I started out my Instagram with them!
But I appreciate just how much I’ve learned along the way, and how I can see the clear transition from amateur to professional as I scroll through my feed.
Though I did not start out as a photographer, practice and learning has improved my Instagram and helped me grow it over the last couple of years.
My photography has come a very long way, and now it’s time for yours to, too!
So without further ado, here are 15 tips to capturing the perfect Instagram photo.
1. The rule of thirds
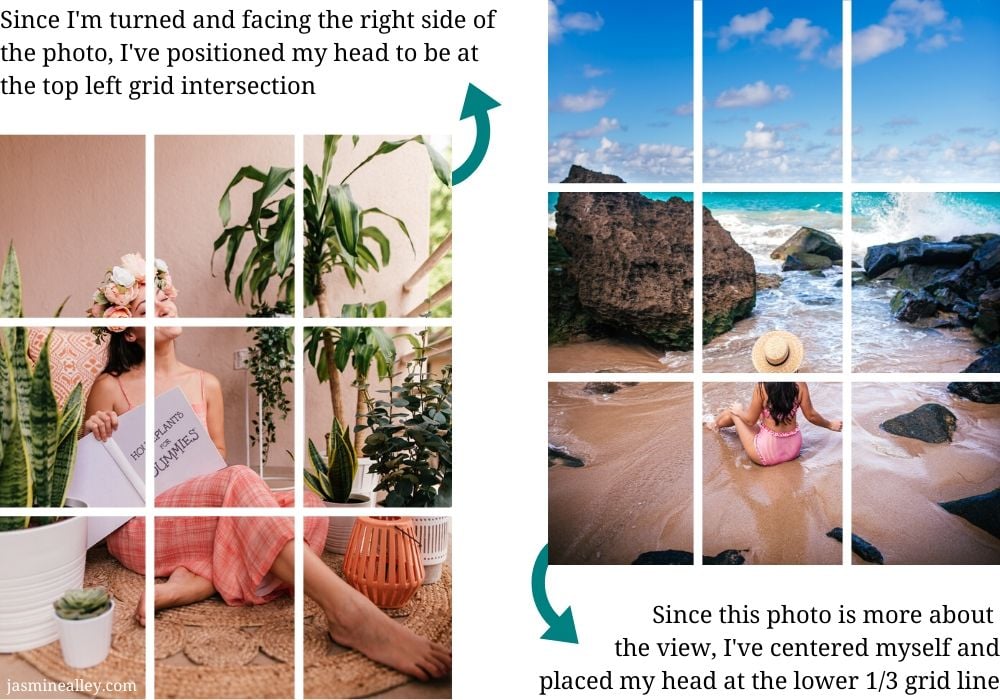
Object placement in photos is key.
As a rule of thumb, use the rule of thirds.
You don’t want things to be too high up in a photo, or too low, or too right, or too left.
So train your eye to automatically position the object of your photo according to the grid lines that divide it into thirds.
2. Use a high quality camera
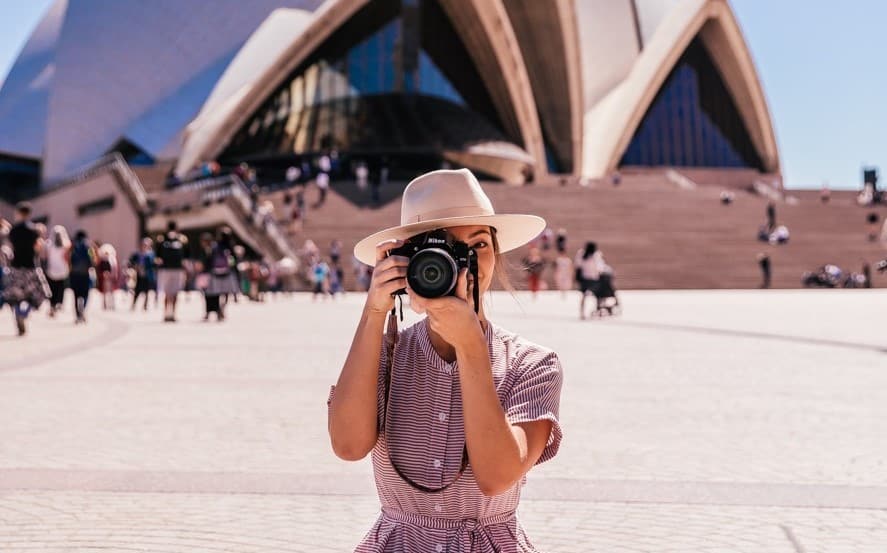
Using a nice, high quality camera completely transformed my Instagram game.
I’m talking about stepping out into the big leagues!
A nice camera makes a world of a difference.
I actually used my phone for the first year of my Instagram career, and the biggest growth happened after I transitioned to my DSLR camera, which you can find here.
In fact, I regret using my phone for so long!
Especially because we went on some incredible trips, like Paris and Rwanda, and I wish we had our camera with us on those trips.
Anyway- if you don’t have the funds to go out and invest in a new camera, you can definitely capture photos on your phone.
You’ll still get great photos using the rest of the non-camera related tips here. But I still recommend saving up for a camera if you have the means!
To see what else is in my photo bag, click here!
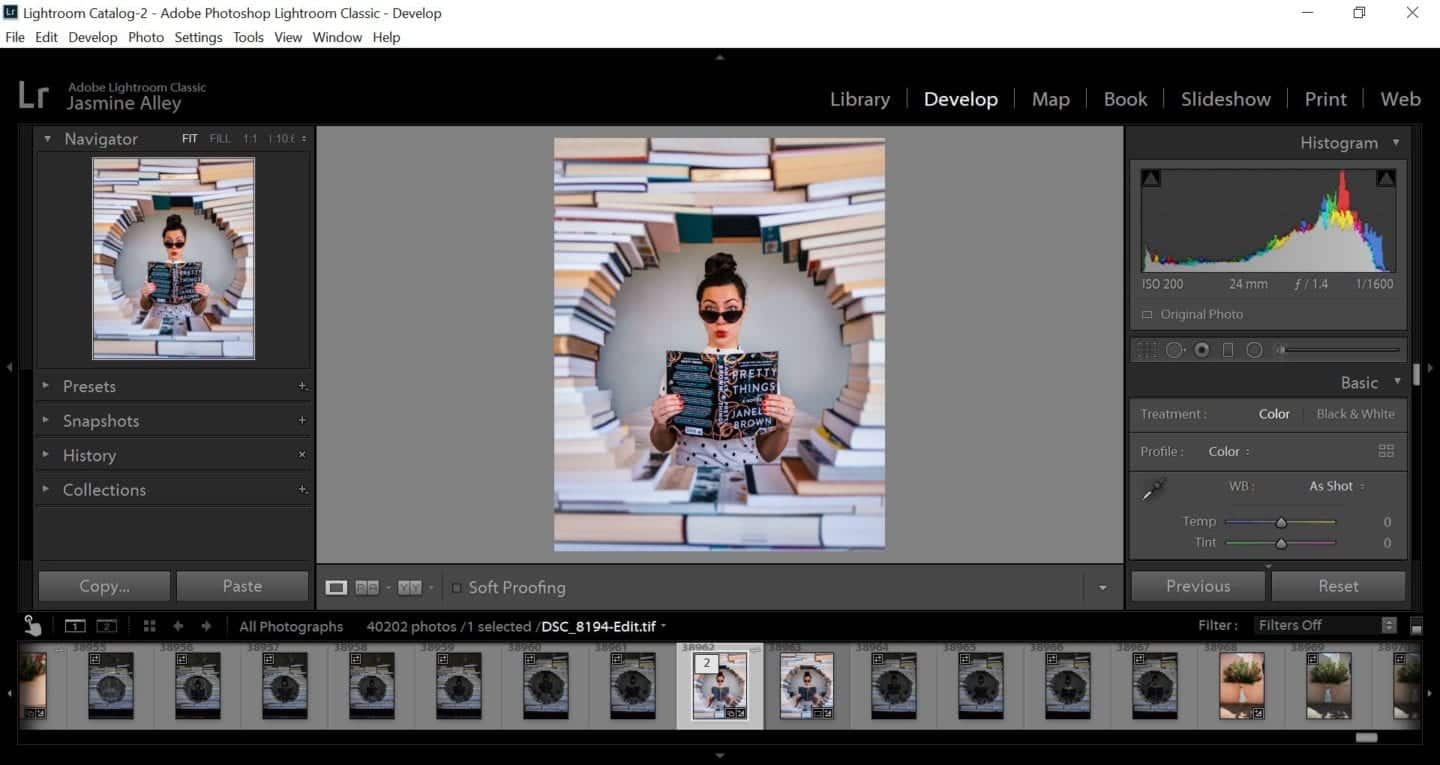
3. Shoot in RAW
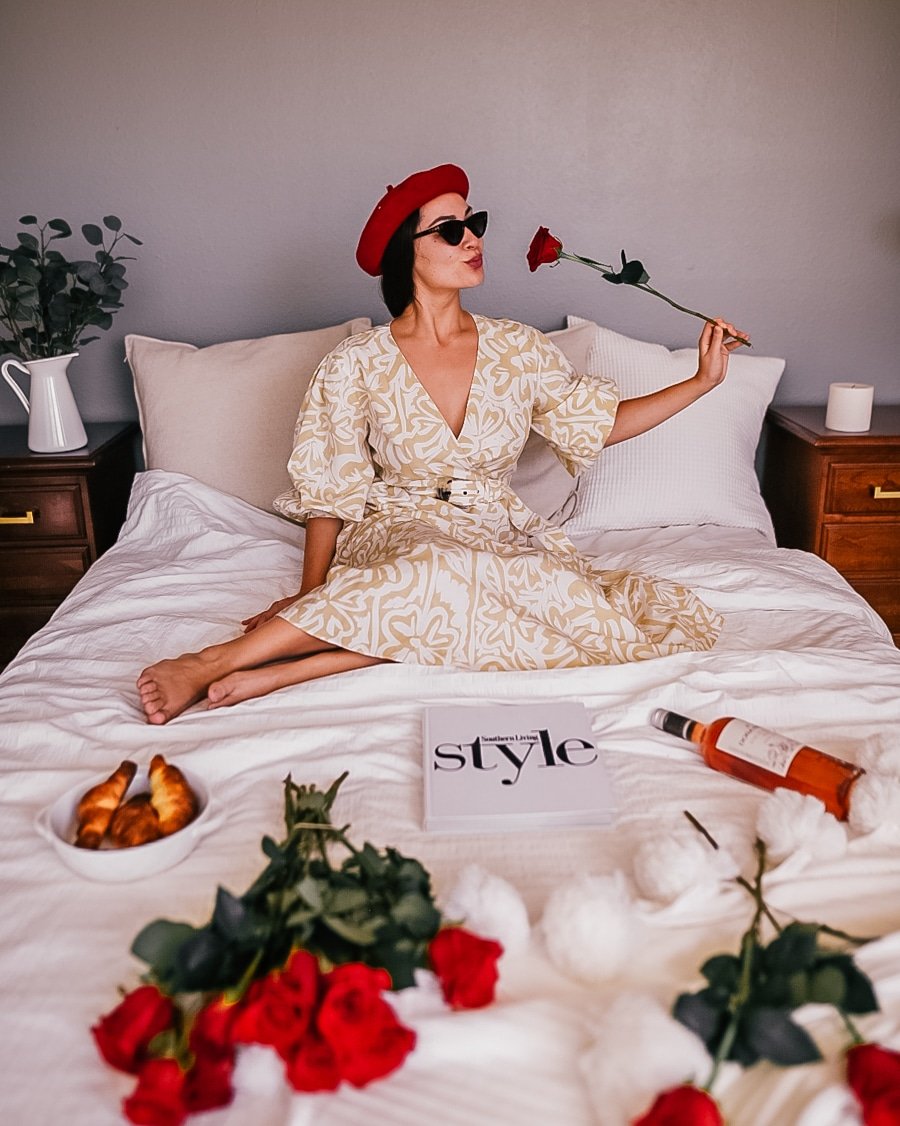
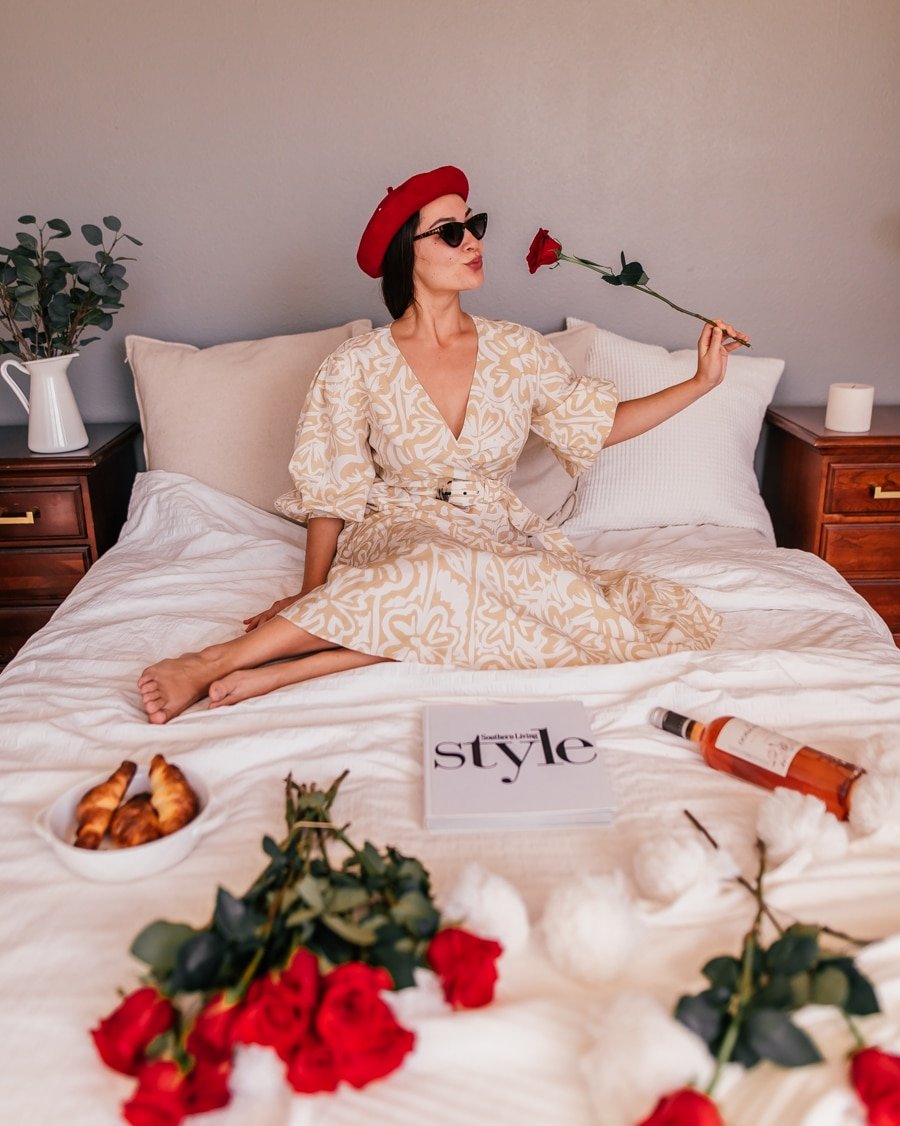
The two photos above are the same photo edited with the same exact filter.
But the first one is a JPEG file, while the second is a RAW file.
What’s the difference?
First thing you might see is the color difference- the second photo is warmer.
A JPEG image is basically your camera capturing the image in a more compact setting, while a RAW image is an uncompressed, much larger data file.
The dynamic range and color gamut are much larger with RAW photos, which is why you’re getting a color difference here.
You can tweak the colors to what you want using Adobe Lightroom- that’s besides the point.
The main point to focus on is that there will be some color differences because of your RAW data file containing so much more information.
Secondly, do you notice how the shadows are softer in the RAW photo?
That’s because of the same fact: RAW files capture so much more information, so bringing up the shadows or decreasing highlights is going to look a lot better in RAW.
So when I shoot in RAW, I usually underexpose my photos so that I don’t lose information in a bright white sky, for example. Then when I brighten it up in Lightroom, I still have all of the information retained in the shadows.
So how do you shoot in RAW?
It’s easy! Just go to your camera setting and select RAW for your file type.
4. Use something in the foreground
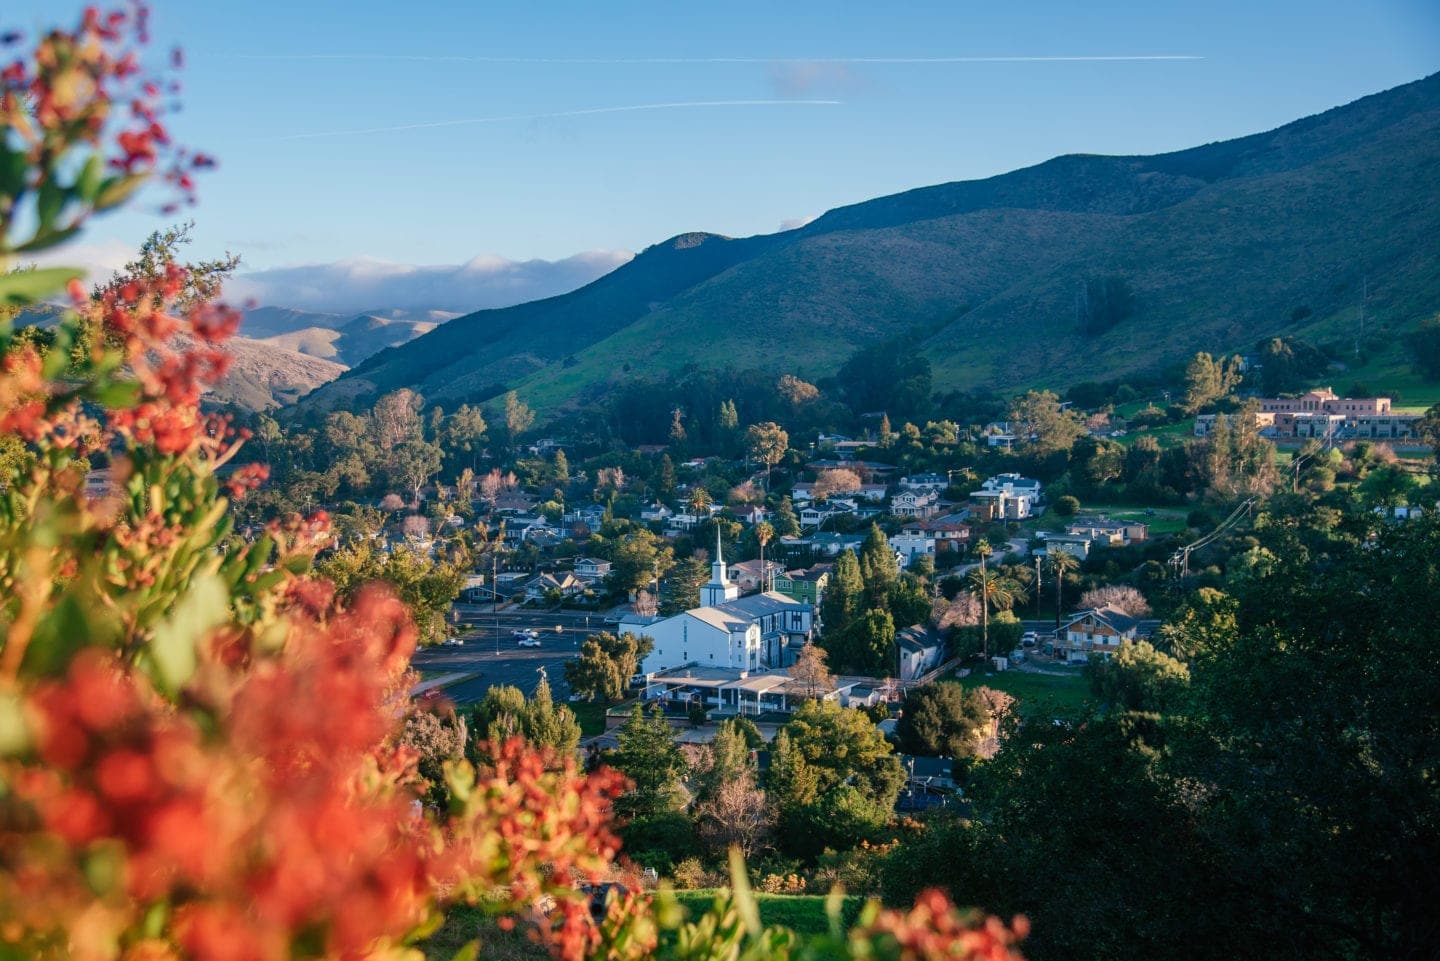
My next Instagram photo tip is to find something pretty in the foreground that you can use for framing.
If this were just a photo of the city, it would still probably be pretty.
But finding these bushes around me added color and complexity to the photo.
They frame the picturesque church and draw your attention to it while adding depth.
So next time you’re doing a photoshoot- think about ways you can draw attention with framing!
5. Play with lenses

Different lenses have different purposes.
Do you want to be able to zoom in a lot, or capture the whole scene?
What about if you want to shoot with the bokeh effect (simplified: blurry background effect) or not?
These factors play into the type of lens you shoot with.
A lens with a low aperture such as this lens I use with a f/1.4 aperture will allow you to create that bokeh effect pretty easily.
A lens with a large zoom range like this one (the 24mm-120mm lens I use) allows you to zoom in on far away subjects or make your background appear larger.
6. Be candid when you’re posing
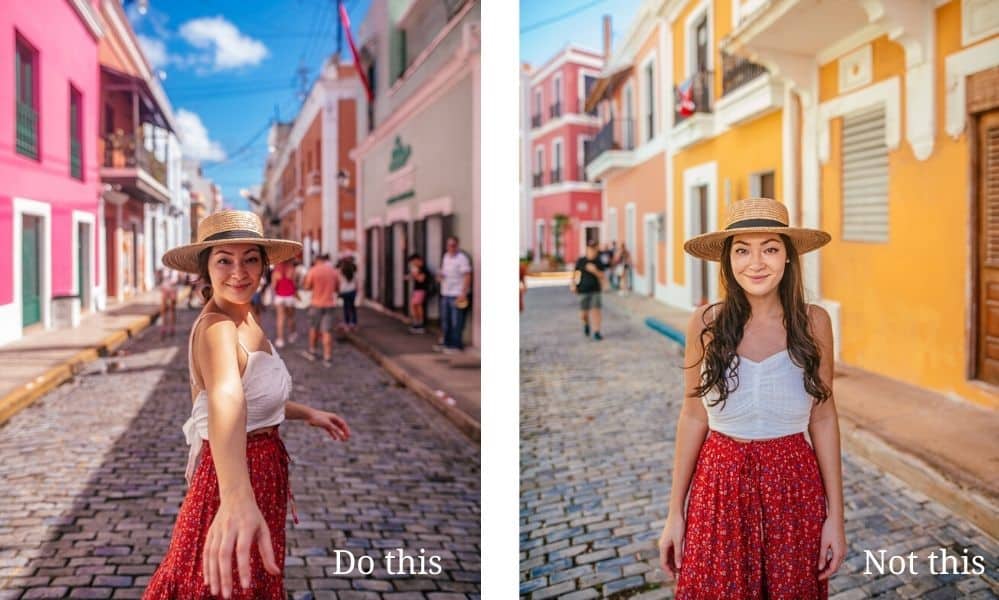
This Instagram photo tip is easier said than done, but I’m going to give you some instructions on how to make this easier!
Being candid while you pose will get your personality out there, which is great for a photo going on a social media platform.
Unless you’re striking a pose that feels candid, you’ll want to ditch that high school senior portrait pose for something that feels more natural.
Why?
Because people like natural!
Here’s one way to think about it.
Say I’m working with a food brand that makes crackers.
Which would look better: a photo of me holding the box of crackers and looking into the camera, smiling?
Or me interacting with the crackers, pouring them out, pretending to eat one, etc.?
The first way seems very posed and sales-y, while the second way feels candid and shows a lifestyle.
So how do you be more candid?
There are a few ways to be more candid in a photo, even when you’re posing.
First you’ll want to set your camera to “quick shutter mode” (you can just google your camera and that keyword to see how to find that setting).
If you’re using a phone, just hold down the camera button and most phones will take continuous photos.
Then use one of these techniques:
- Jump into the photo frame
- Twirl and incorporate movement with your clothes or arms
- Laugh! Even a fake laugh will probably end up making you laugh for real, just because of how silly you’ll feel!
- Look away (this is my go-to pose for sunrise photos when I’ve crawled out of bed to go shoot the sunset and have no make up on!)
- Shake your head- get that hair flying!
You might end up with 99 bad photos and 1 good one- but, hey! That’s all you need in the end, right?
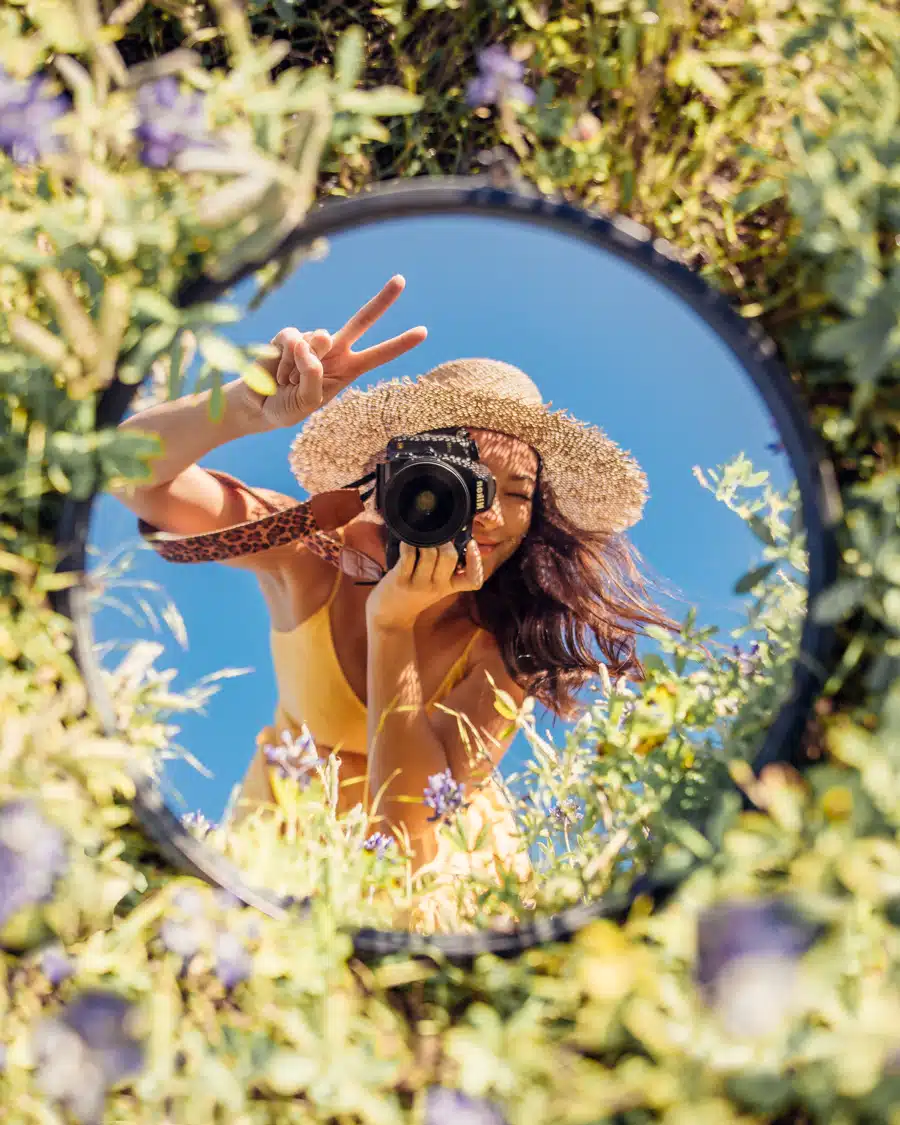
7. Use props


Let’s be real.
Unless you’re a professional model or look like one, it can be pretty difficult to pose for photos.
Sometimes it’s just plain awkward and you have no clue what in the world to do with your hands.
Enter: props.
Props are a great way to not only make your photo more interesting, but to make your poses more candid as well.
My most signature props are my hats- I almost always have one on because (a) I love the way they look in photos, (b) they make for easy hair days, and (c) I have something to grab when I feel like I’ve run out of poses!
8. Consider your background
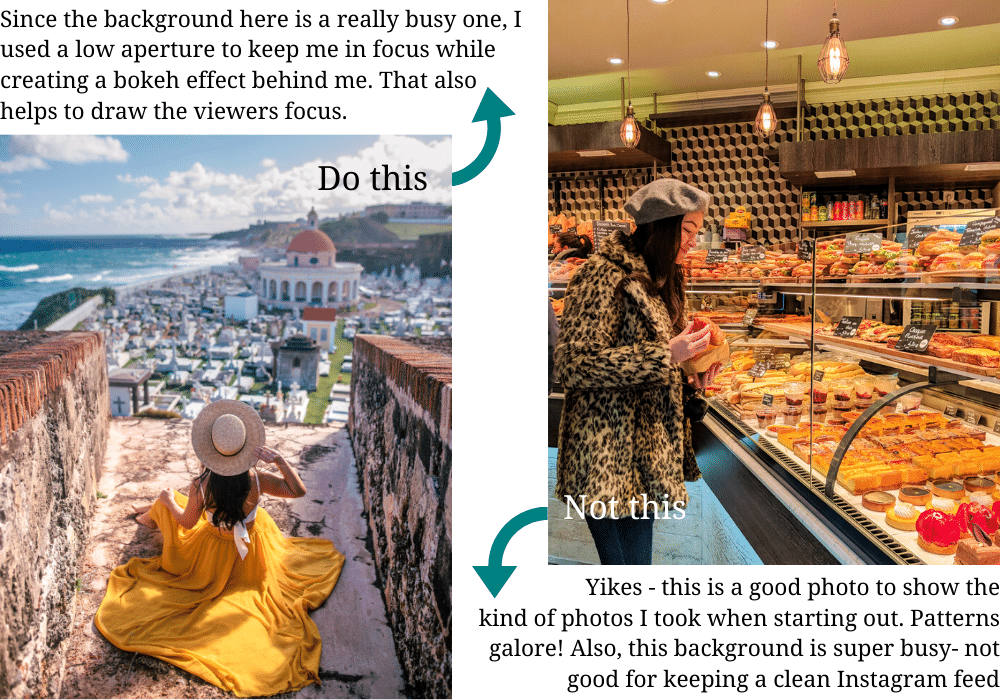
You don’t want your background to be too busy, since that’ll make the photo less “clean” looking.
A busy background also detracts from the subject of a photo.
Try to keep things simple and clean. Look for somewhere without too many patterns or colors.
If you’re traveling and have a busy background, one way to keep your photo looking clean is to create a bokeh effect (aka the blurry background effect).
How do you do that?
It requires a camera, but don’t worry if you’re not ready to shoot in manual.
You can always switch your camera to Aperture mode and let it adjust the other settings automatically.
By using a low aperture and focusing on you (or whoever the subject is), your camera will create that blurry background effect.
Another way to avoid busyness in a photo is to find a good angle where your background is less cluttered.
I’ll cover more on that later in #13!
9. Keep your lines straight
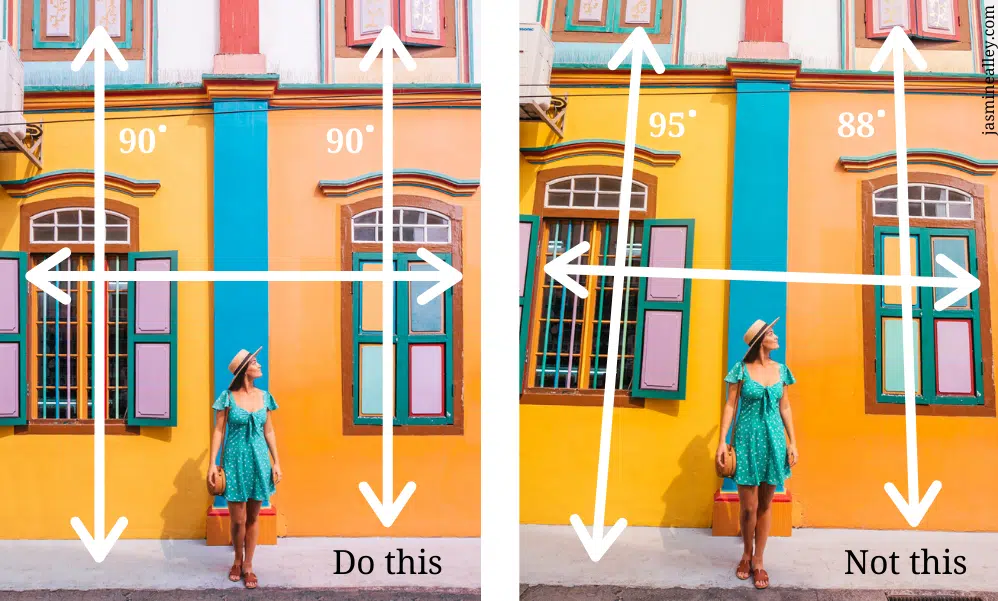
Another great Instagram photo tip is to keep your lines straight!
There are definitely exceptions to this rule, especially if you’re getting creative with angles (see #13 in this list for more on that topic).
But for the most part, you’ll want to line up your lines and shoot straight.
Don’t worry if your photo is crooked when you take it- the photo you see on the right was the original photo we got.
Later when you’re editing in Adobe Lightroom, you can use the straighten and transform tools to straighten out your photo.
10. Use quality editing apps
There are some great editing apps out there.
My favorite by far is Adobe Lightroom.
It is the most versatile app I’ve found, and I use it for every single photo.
There is a free version and a subscription version.
I highly recommend the monthly Adobe Creative Cloud subscription because it gives you many more features, tools, and programs.
If you haven’t used Lightroom before, start off with the free mobile app, then upgrade when you’re comfortable with it and see just how much magic it can bring to your images!
Other mobile apps I love, but don’t use as frequently, include:
- Snapseed- you can expand your photo and use a smart healing tool to remove unwanted things from your photo
- Afterlight- for their “dusty” filters
- Lens Distortion- add a light flare
- PicsArt- lets you “photoshop” in an intuitive way without having to use actual Adobe Photoshop
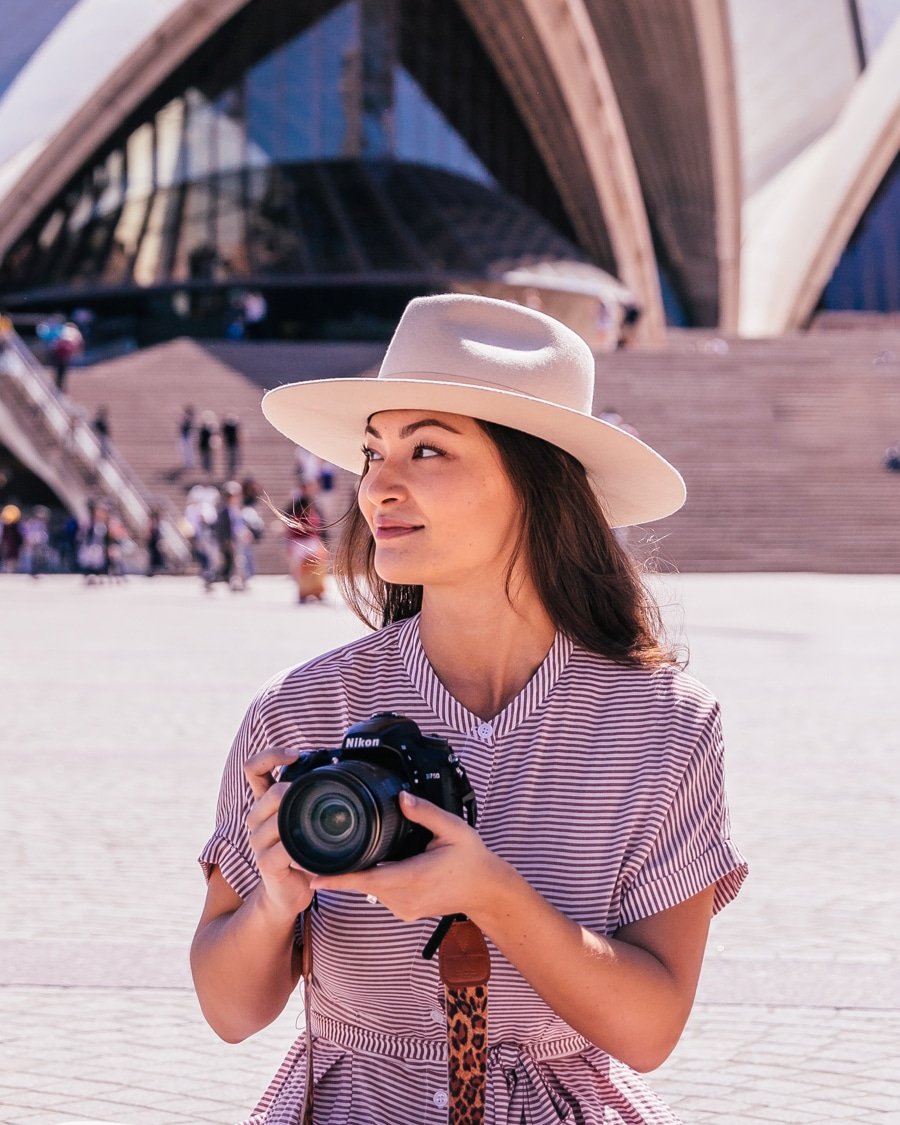
11. Location scout
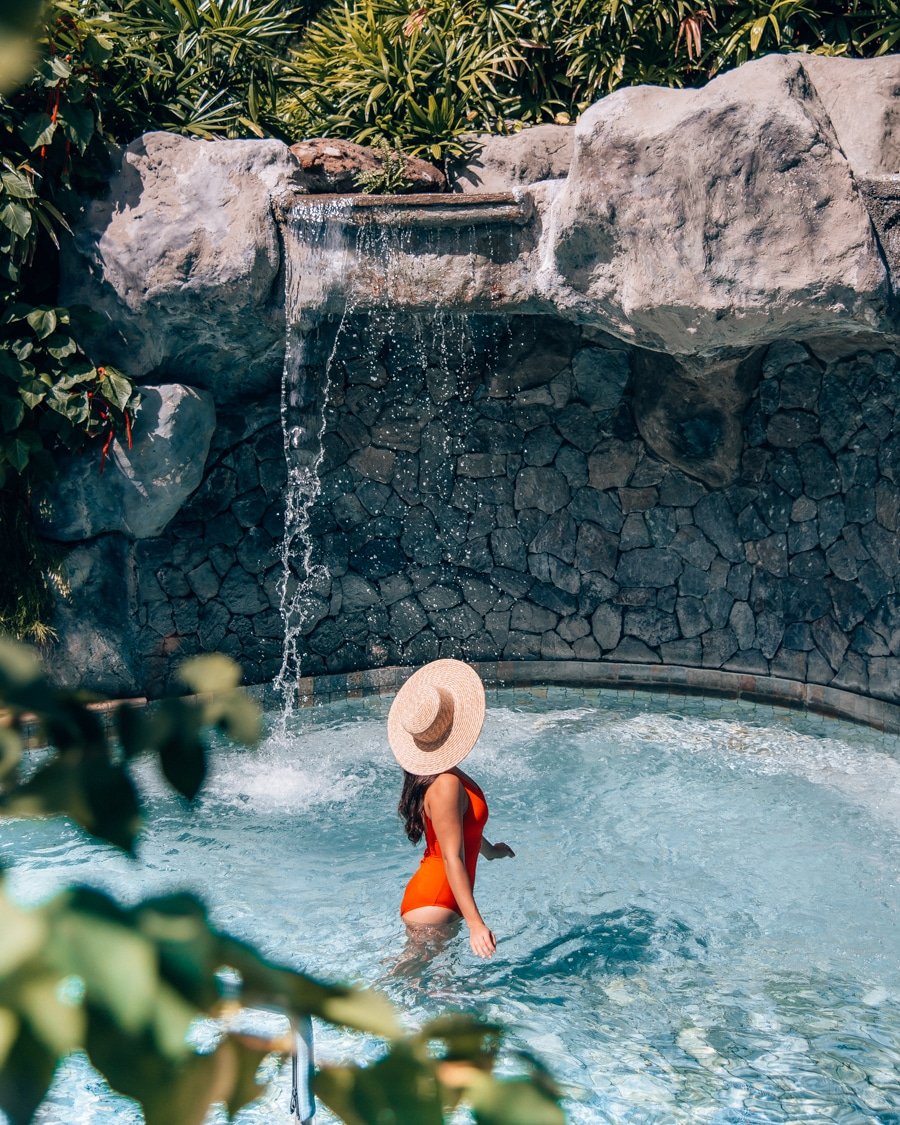
As soon as I arrive somewhere new, the first thing I do is location scout.
Basically that just means finding the best possible photo spots in a given location.
Whether you do this on a small scale, like at a hotel, or on a big scale, in a new city, this will save you time and help your creative juices start flowing.
Here’s an example of the process.
The two photos I shared here are from the Four Seasons Costa Rica.
When my friend Angie and I first arrived, we scoped out the hotel and walked all around to find the most beautiful spots in the area.
We took pictures throughout the hotel, then looked back at them to see which locations were truly Insta-worthy.
By narrowing it down, we saved time and had a sense of direction for our Instagram photos.
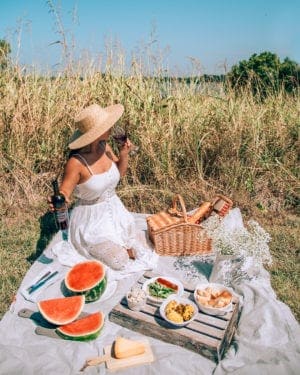
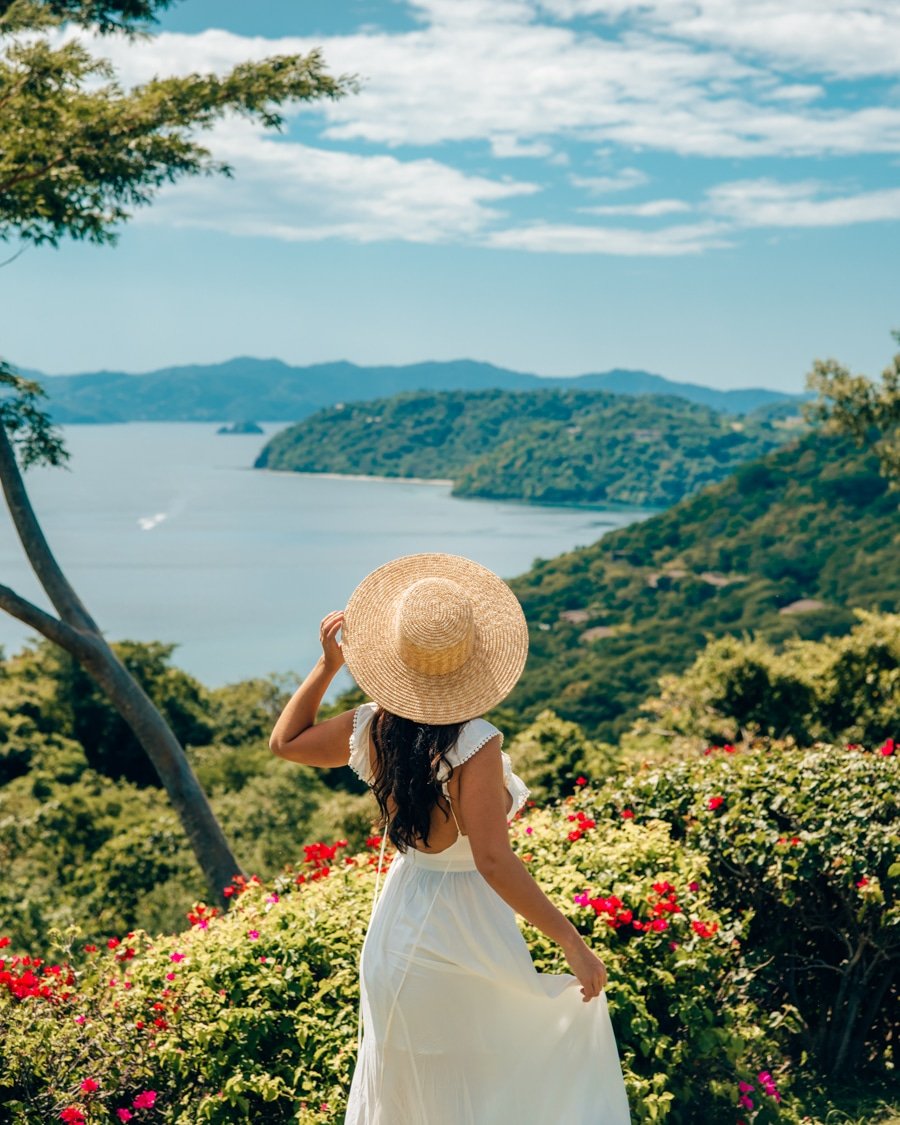
12. Color coordinate
Now that you’ve done research on your location, you can color coordinate to stand out!
(I said stand out- not clash!)
I rarely wear patterns in my photos because they make the photo busier and usually don’t go as well with my photo backgrounds.
If you’re planning a simple photoshoot with a plain background, then by all means- wear something patterned!
And make sure whatever you’re wearing doesn’t blend in- unless that’s the look you’re going for.
If you’re heading to a field of bluebonnets, don’t wear blue. Instead, wear red or white or yellow so that you stand out.
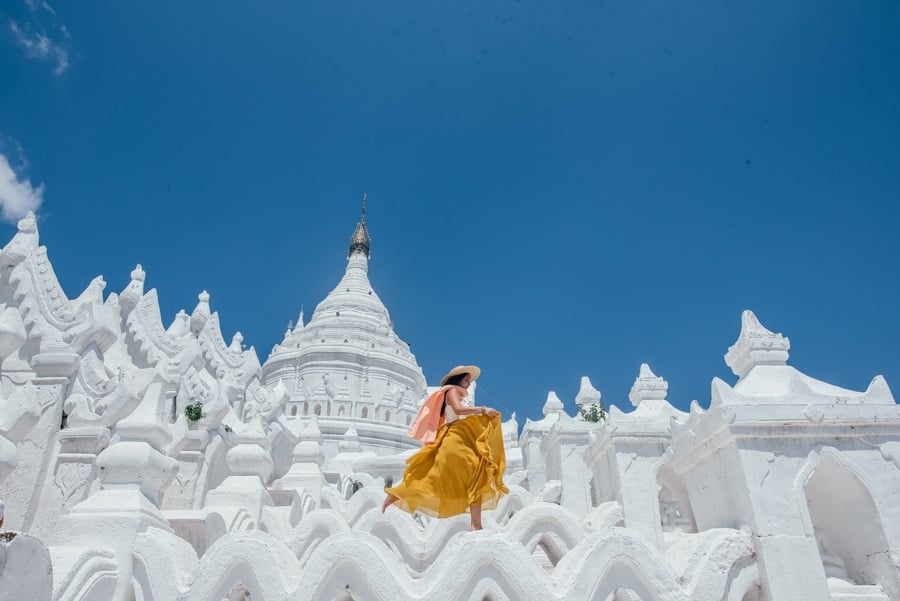
13. Find the most interesting angle
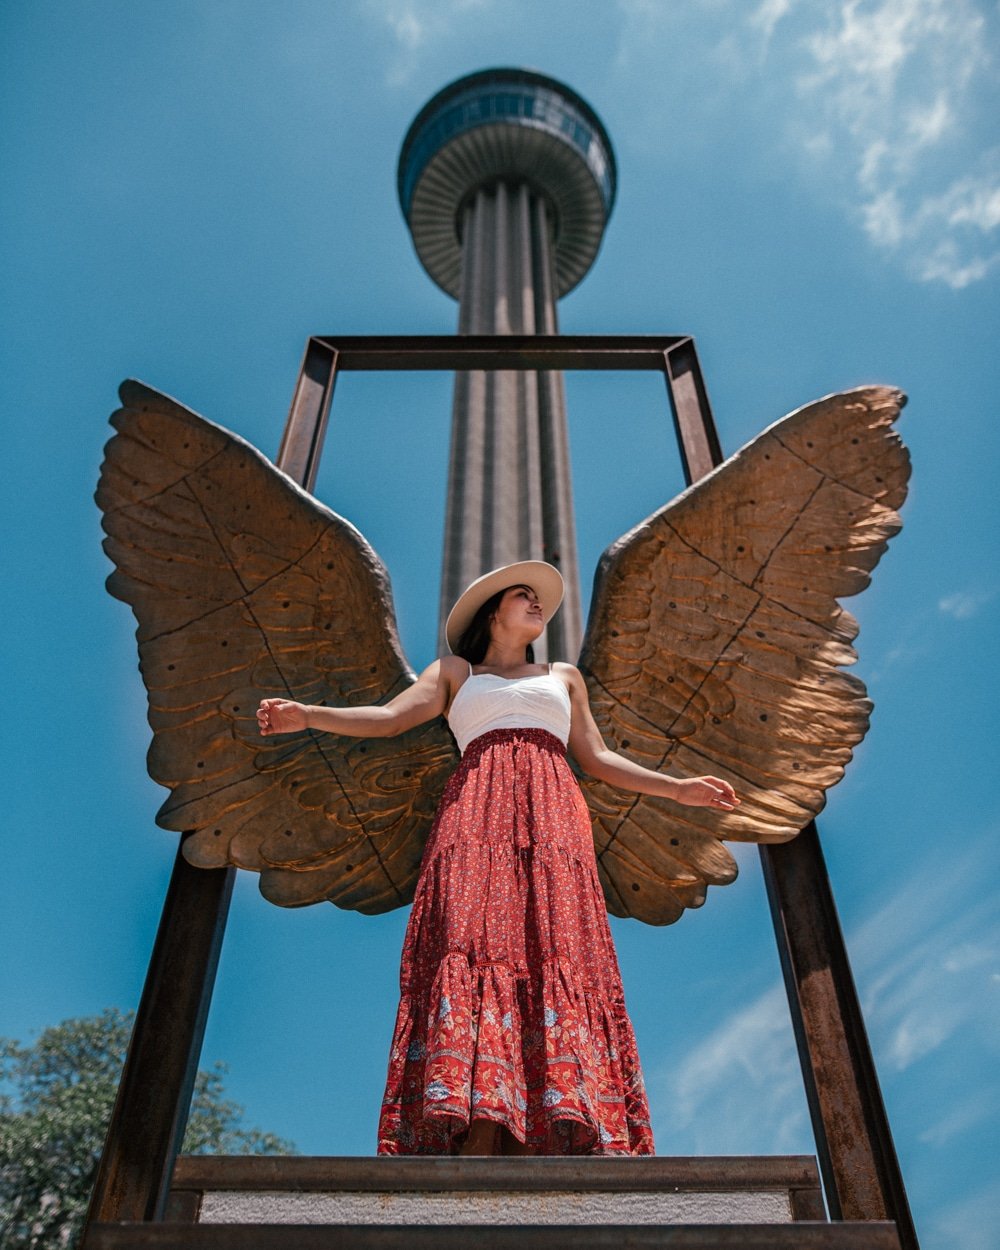
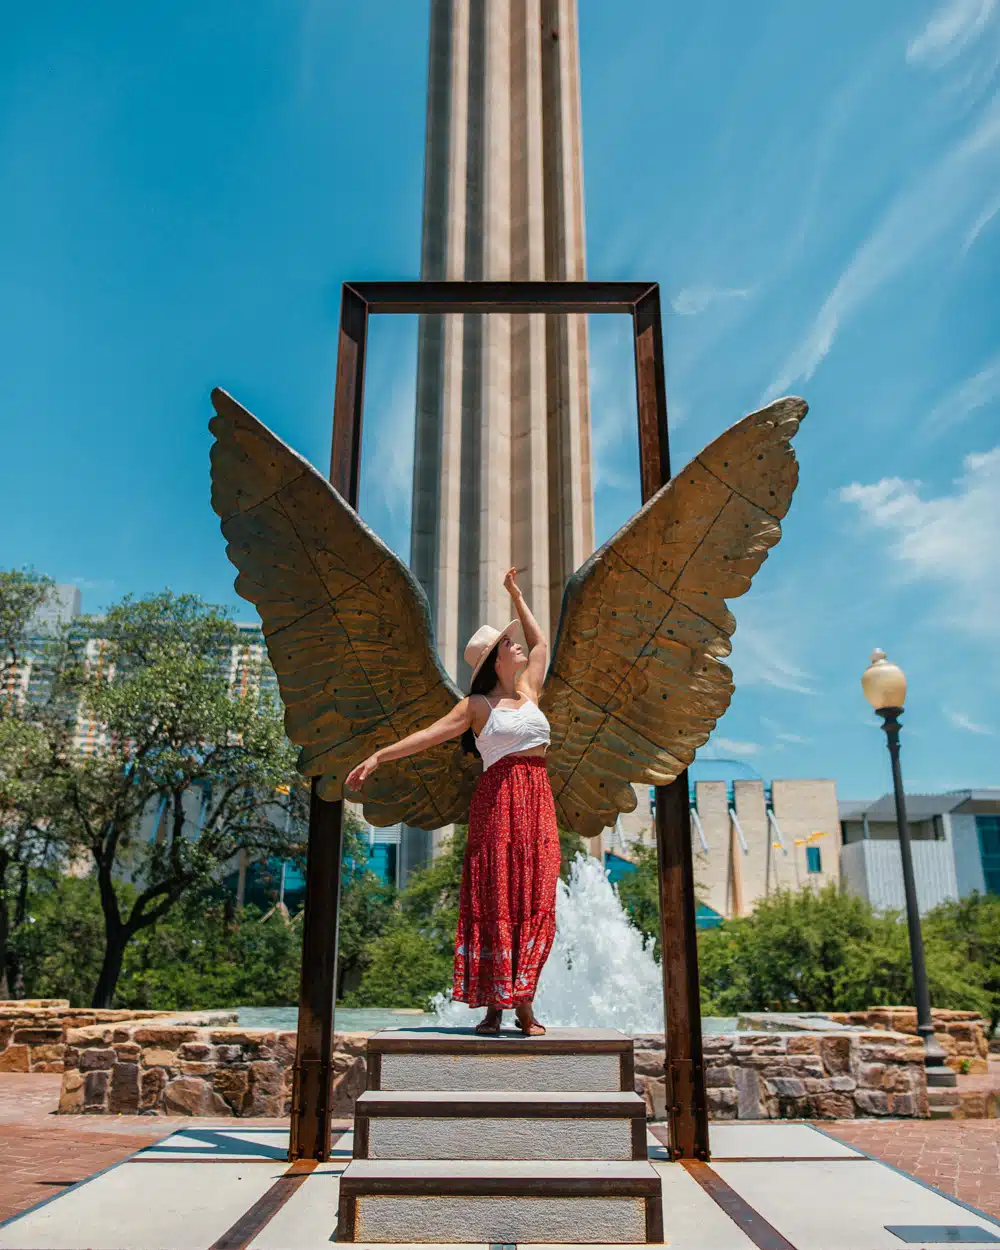
There are multiple ways you can shoot at the exact same place.
Think about what’s appearing in the background when you move around and change the direction of your shot.
Spend a few minutes assessing multiple angles and taking photos at these different angles so you can see which looks best.
For example, the two photos you see above are pretty different, yet they are essentially of the same thing.
One removes the busy background by pointing up to the sky, which also allows you to see the full tower behind me.
The other gives you a full view of the sculpture and everything in the background. It is also taken further away.
These two different angles lead to two different results.
And I know I listed getting your lines straight up and down, but here’s the exception.
As you can see, sometimes an angled photo allows you to capture something you otherwise wouldn’t.
14. Get the lighting right
Lighting can make a world of a difference in photos.
My favorite times of day to shoot outdoors is during golden hour (a couple of hours after sunrise and before sunset), and sunrise and sunset.
Waking up for sunrise is not fun for me, but I do it for the ‘gram!
Sunrise photoshoots are growing on me- you get that peaceful early morning sunrise feeling, knowing that most of the world right around you is still asleep.
The sun comes out, the sky (hopefully) lights up with colors, and you have a moment all to yourself (and your photographer).
Then you have good lighting for the next three hours or so! Perfect for outdoor photoshoots!
What if you’re traveling trying to hit as many photo locations as possible and/or your time isn’t flexible?
While the midday sun may be harsh, you can help correct it in Adobe Lightroom by playing with the shadows, blacks, highlights, and dehaze tools.
And for indoor photoshoots, if you do a lot of them, consider buying a softbox light kit like this one off of Amazon for guaranteed good lighting.
15. Apply a Lightroom Preset
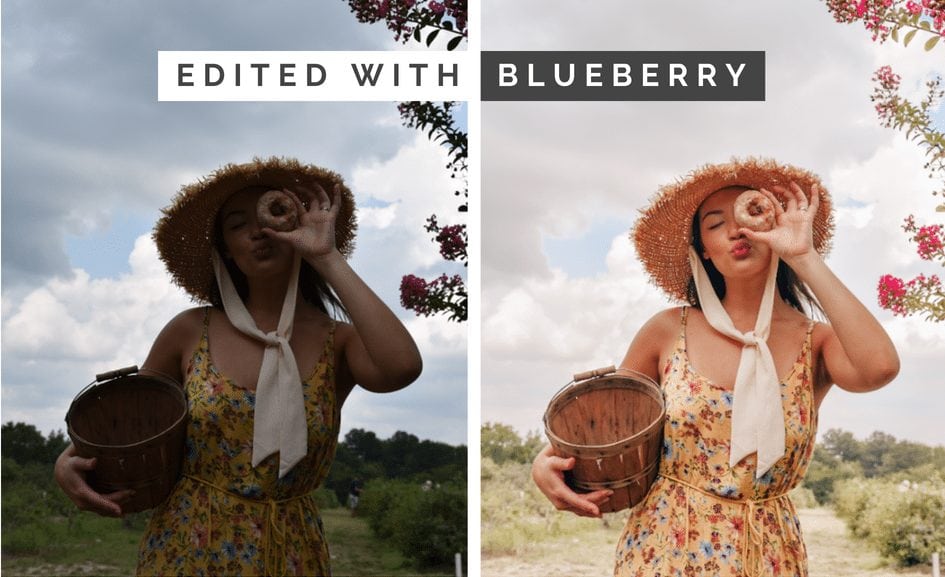
My last Instagram photo tip is to apply an Adobe Lightroom preset to your photos.
Lightroom presets are a filter you can apply with one click- but most of the time you’ll still need to adjust the levels in your photo to make sure it turns out exactly how you want it.
Presets are a great jumping off point when you’re editing your photos.
Not only will they help make your photos look awesome, but they’ll help create a uniform look across your Instagram feed.
If you have a creator in mind whose feed you love, see if they have a website where they sell their presets.
A lot of creators sell their Lightroom presets, so try investing in a few to see what you like!
Once you download their presets, you can easily import them into Adobe Lightroom to watch them do their thing.
And now that you have the tips to turn your Instagram photos into professional content, check out these 30 ways to improve your Instagram this year!
Happy ‘gramming!
Jasmine
PS. If you found this post helpful, please share it to Pinterest! You can use either of these pins for easy pinning!