
With so many reels popping up on Instagram, it’s important to make yours stand out. And if you’ve noticed that your videos don’t look as good as other reels, it might be that you’re simply not optimizing your reels properly. As a travel blogger and Instagram influencer, reels are a big part of my brand. Here I’m going to cover how to upload high-quality reels to Instagram and the best export settings for Instagram reels.
Because here’s the thing. Unfortunately, Instagram compresses videos, which often leads to blurry or pixelated reels. These low-quality reels simply aren’t as appealing to viewers as smooth, high-quality videos.
But the good news is, you can make high-quality reels using just your phone with the right export and upload settings! Here I’ll share tips on the best export settings for Instagram reels and tips on how to upload high-quality reels to Instagram. These two things go hand-in-hand! I’ll also talk about what settings you should film in.
This article will be helpful for you if you mainly film videos on your phone and edit videos on your phone (instead of using a high-tech desktop video editor). Bonus points if you have an iPhone, since that’s what I use. However, Android users should be able to find corresponding settings to the ones I mention here.
By the way, I should mention that I learned all of this the hard way. Even as a travel blogger shooting 4k (aka high-quality) videos on my iPhone, my reels were still blurry! Long story short, I learned that I had accidentally turned off a crucial step when I upgraded my iPhone and was using the wrong settings. Whoops!
And when I was trying to figure out what I was doing wrong, I turned to Google, other bloggers, and Instagram’s Help Page… not one person or article gave me all the information I was looking for.
Fast forward a few weeks (and a handful of blurry reels) and now I’ve got high-quality reels that look as good as they did when I filmed them. Now I’m going to share ALL of that information with you!
We’ll discuss:
- The best settings for filming videos on your phone
- How to upload high-quality reels to Instagram
- And the best export settings for Instagram Reels using phone app video editors
So you’ll get to learn from my mistakes and see the information I’ve gathered in the process! Let’s get to it!
The Best Phone Settings for Filming Instagram Reels
If you’re using your phone to film videos for Instagram reels, you’ll want to be sure you’re using the highest quality settings possible.
We travel with a Nikon D750, a DSLR camera that I capture all of my photos with. However, the thought of filming all of my travel videos with my big ‘ol Nikon sounds like a big pain in the you-know-what.
The good thing is that phones these days are remarkable at capturing photos and videos. Sure, there’s still a difference. And while the difference between phone and camera photos is big enough for me to nix phone photos, when it comes to videos I mainly use my iPhone.
(In fact, the only video I don’t take on my phone is drone footage or underwater footage. For those, I use my DJI Mavik Air 2 and my GoPro Hero 9, respectively.)
But let’s go back to filming high-quality phone videos. I film everything on my iPhone 14 Pro. As such, I’ll share iPhone settings, but you should be able to find similar settings on an Android phone.
Here are the iPhone settings you should choose:
Turn off HDR
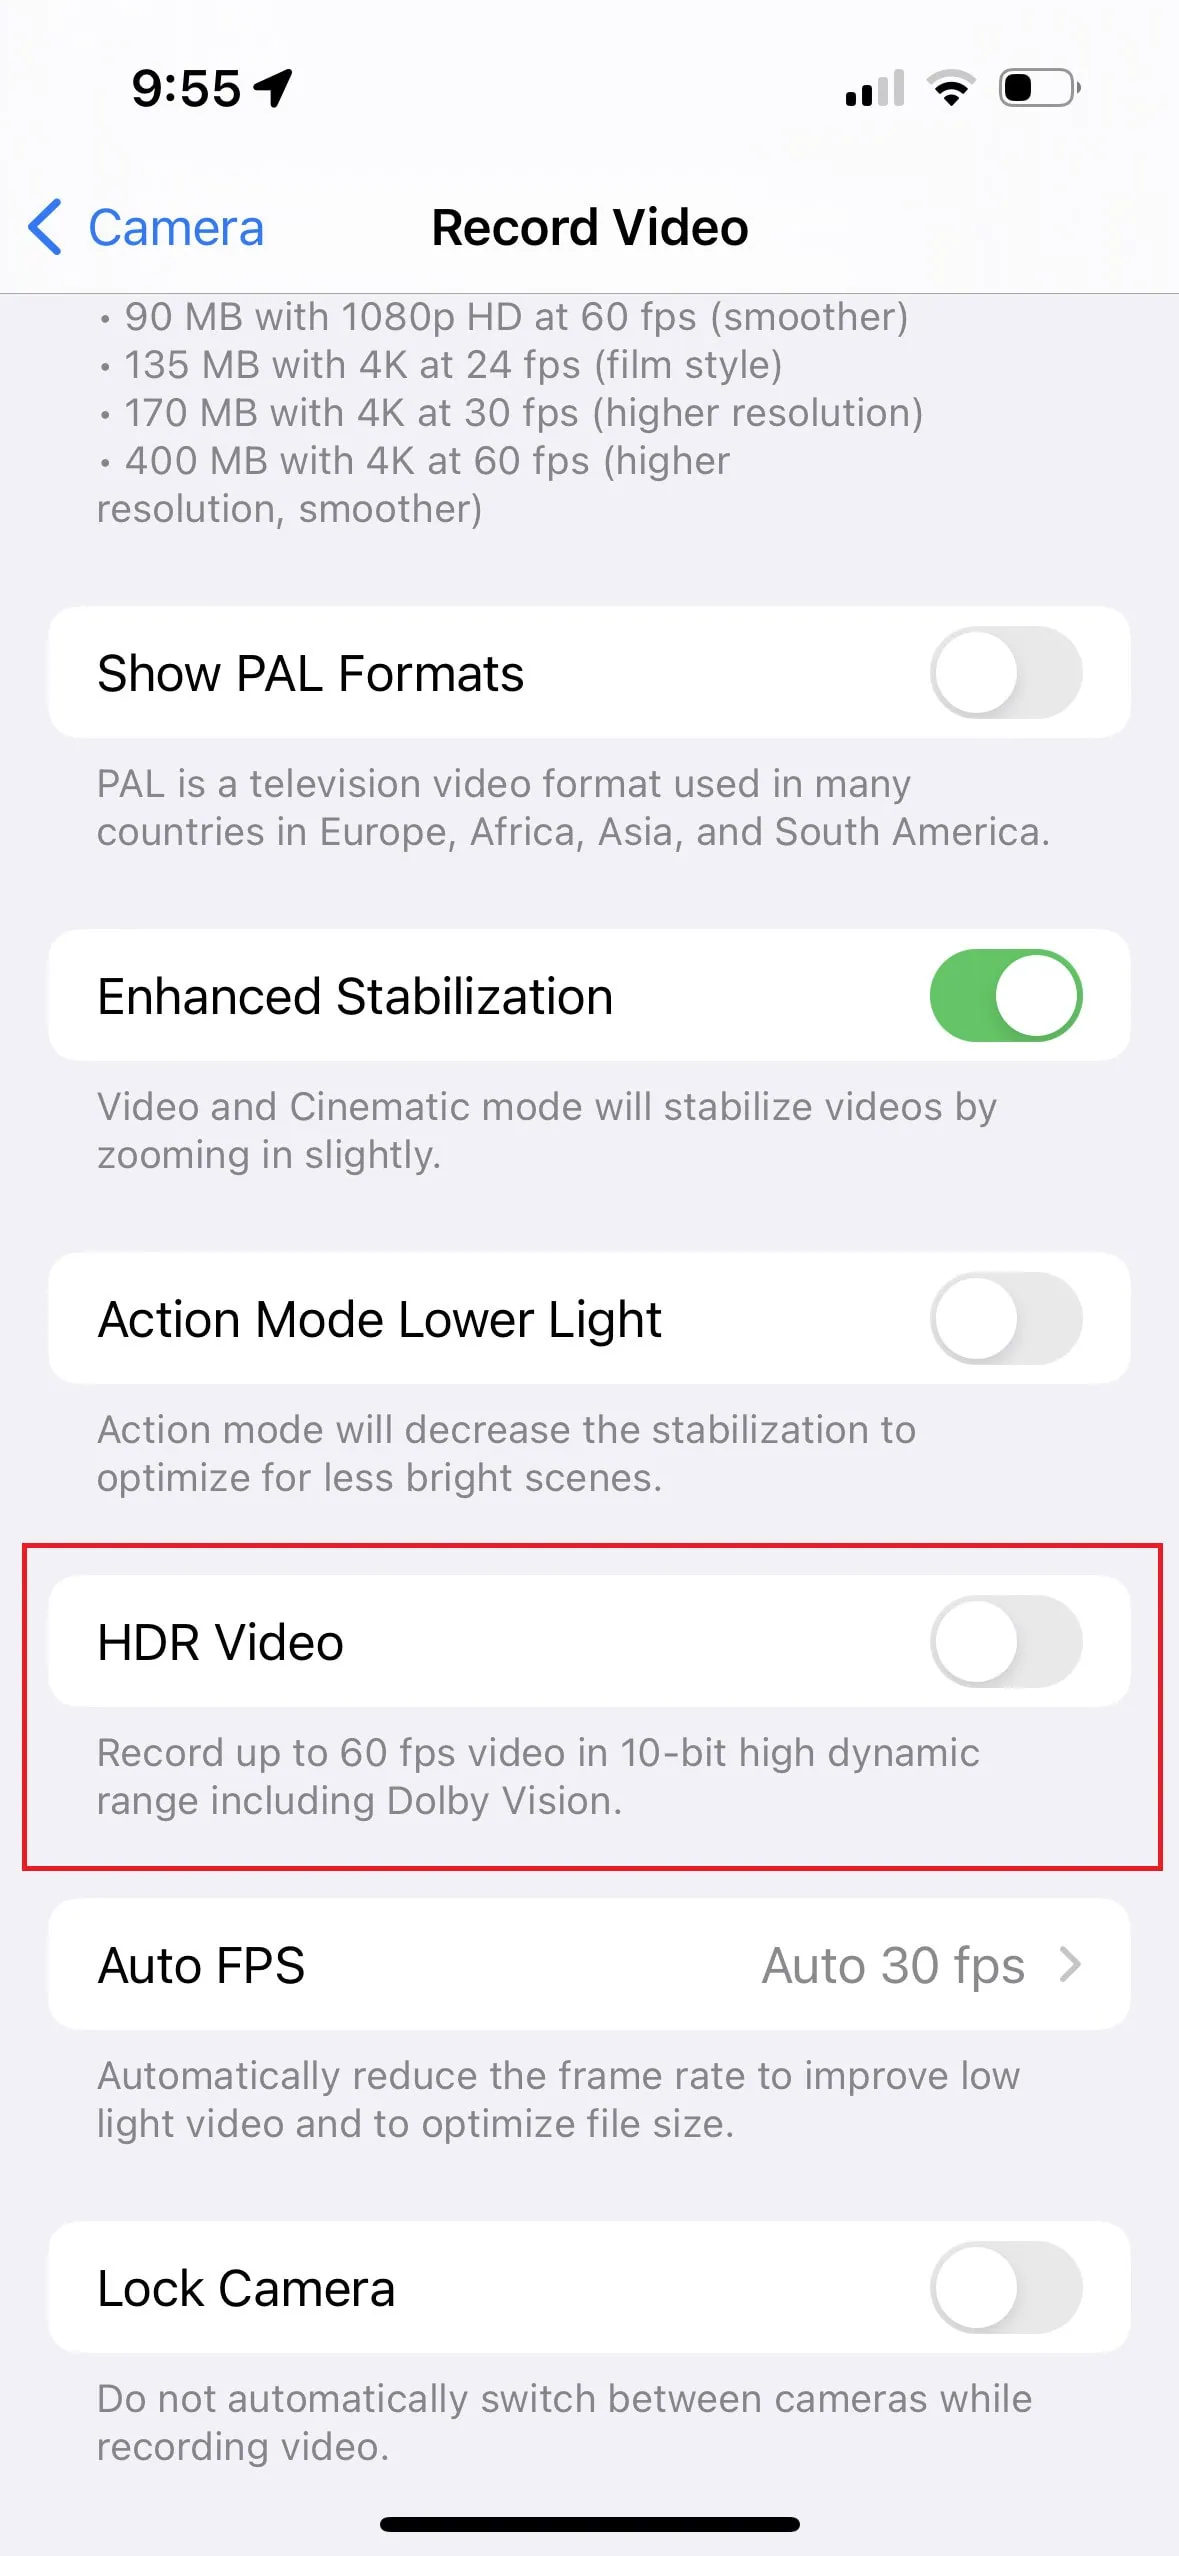
Settings > Camera Settings > Record Video > Turn off “HDR Video”.
Turning off HDR Video makes your videos compatible with more video editors.
Select 4k at 60fps
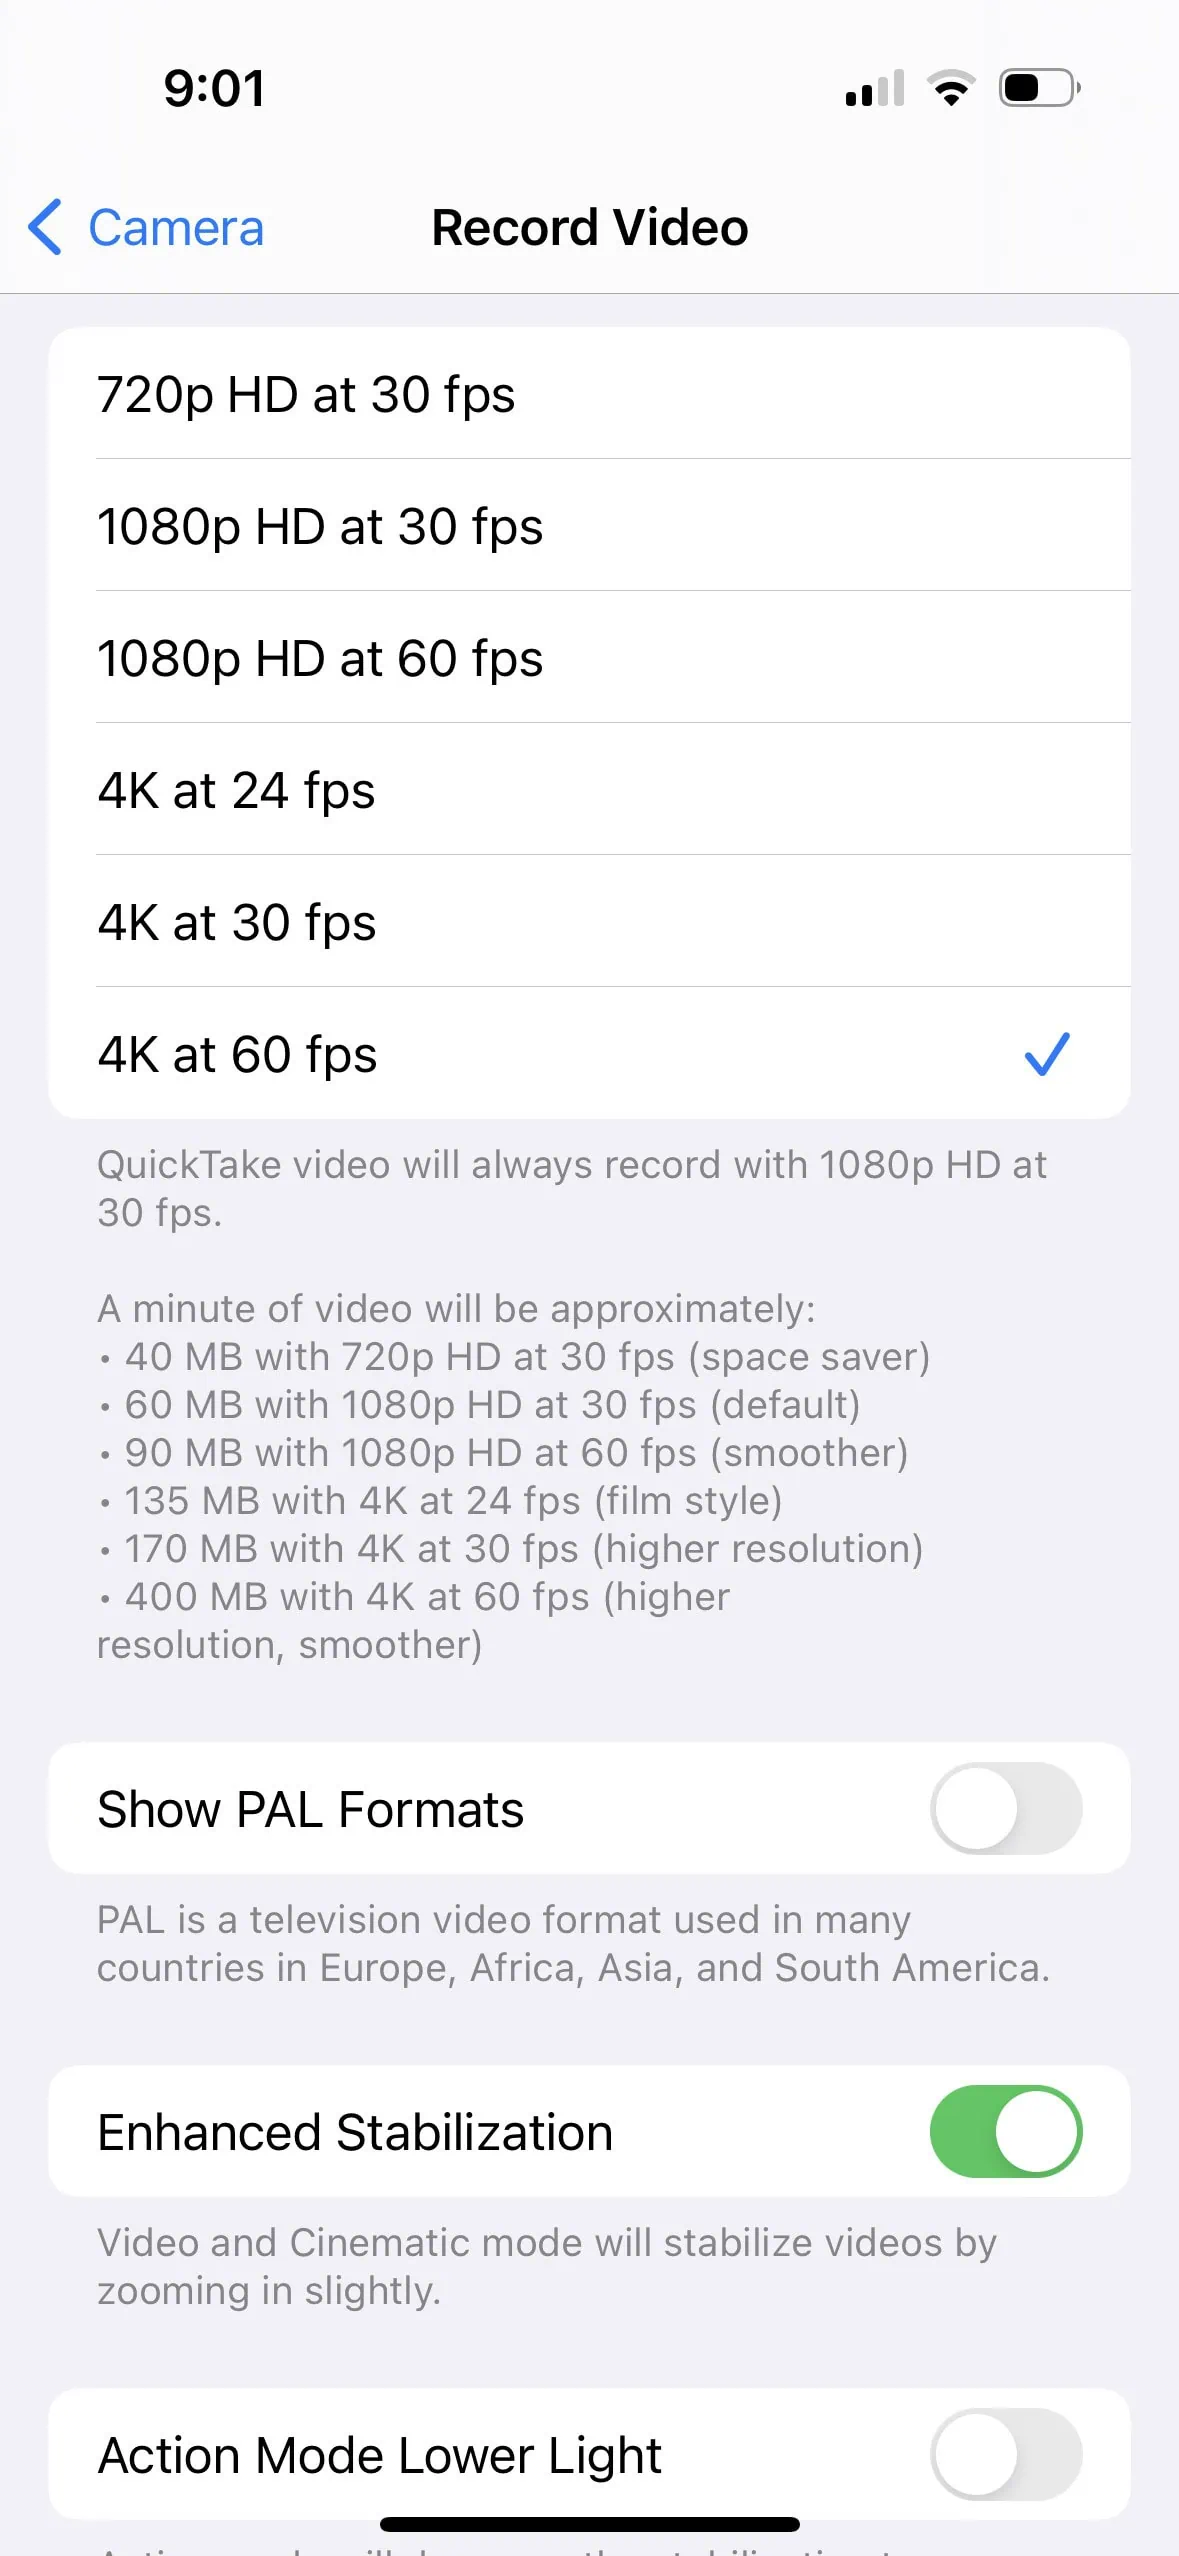
Settings > Camera Settings > Record Video > Select 4k 60 frames per second.
People have different preferences for frame rate but I like 60fps since it looks better with a lot of movement in videos. My hands can get shaky in videos but the 60fps pretty much eliminates that movement. Also, you can always slow it down in video editing apps!
Some reasons you might prefer 24 or 30fps: a lower frame rate will look more natural, and going as low as 24 makes your frames look more cinematic/artistic. (Think of it this way: 24fps=film, 30fps=standard, and 60fps=smooth. You can play around with video recordings to see which you like the most!)
4k will use a lot of storage on your phone, but as long as you have an iCloud or Google Photos account, you should be able to save your videos to the cloud so that they don’t take up as much room on your phone!
Extra Settings I Use
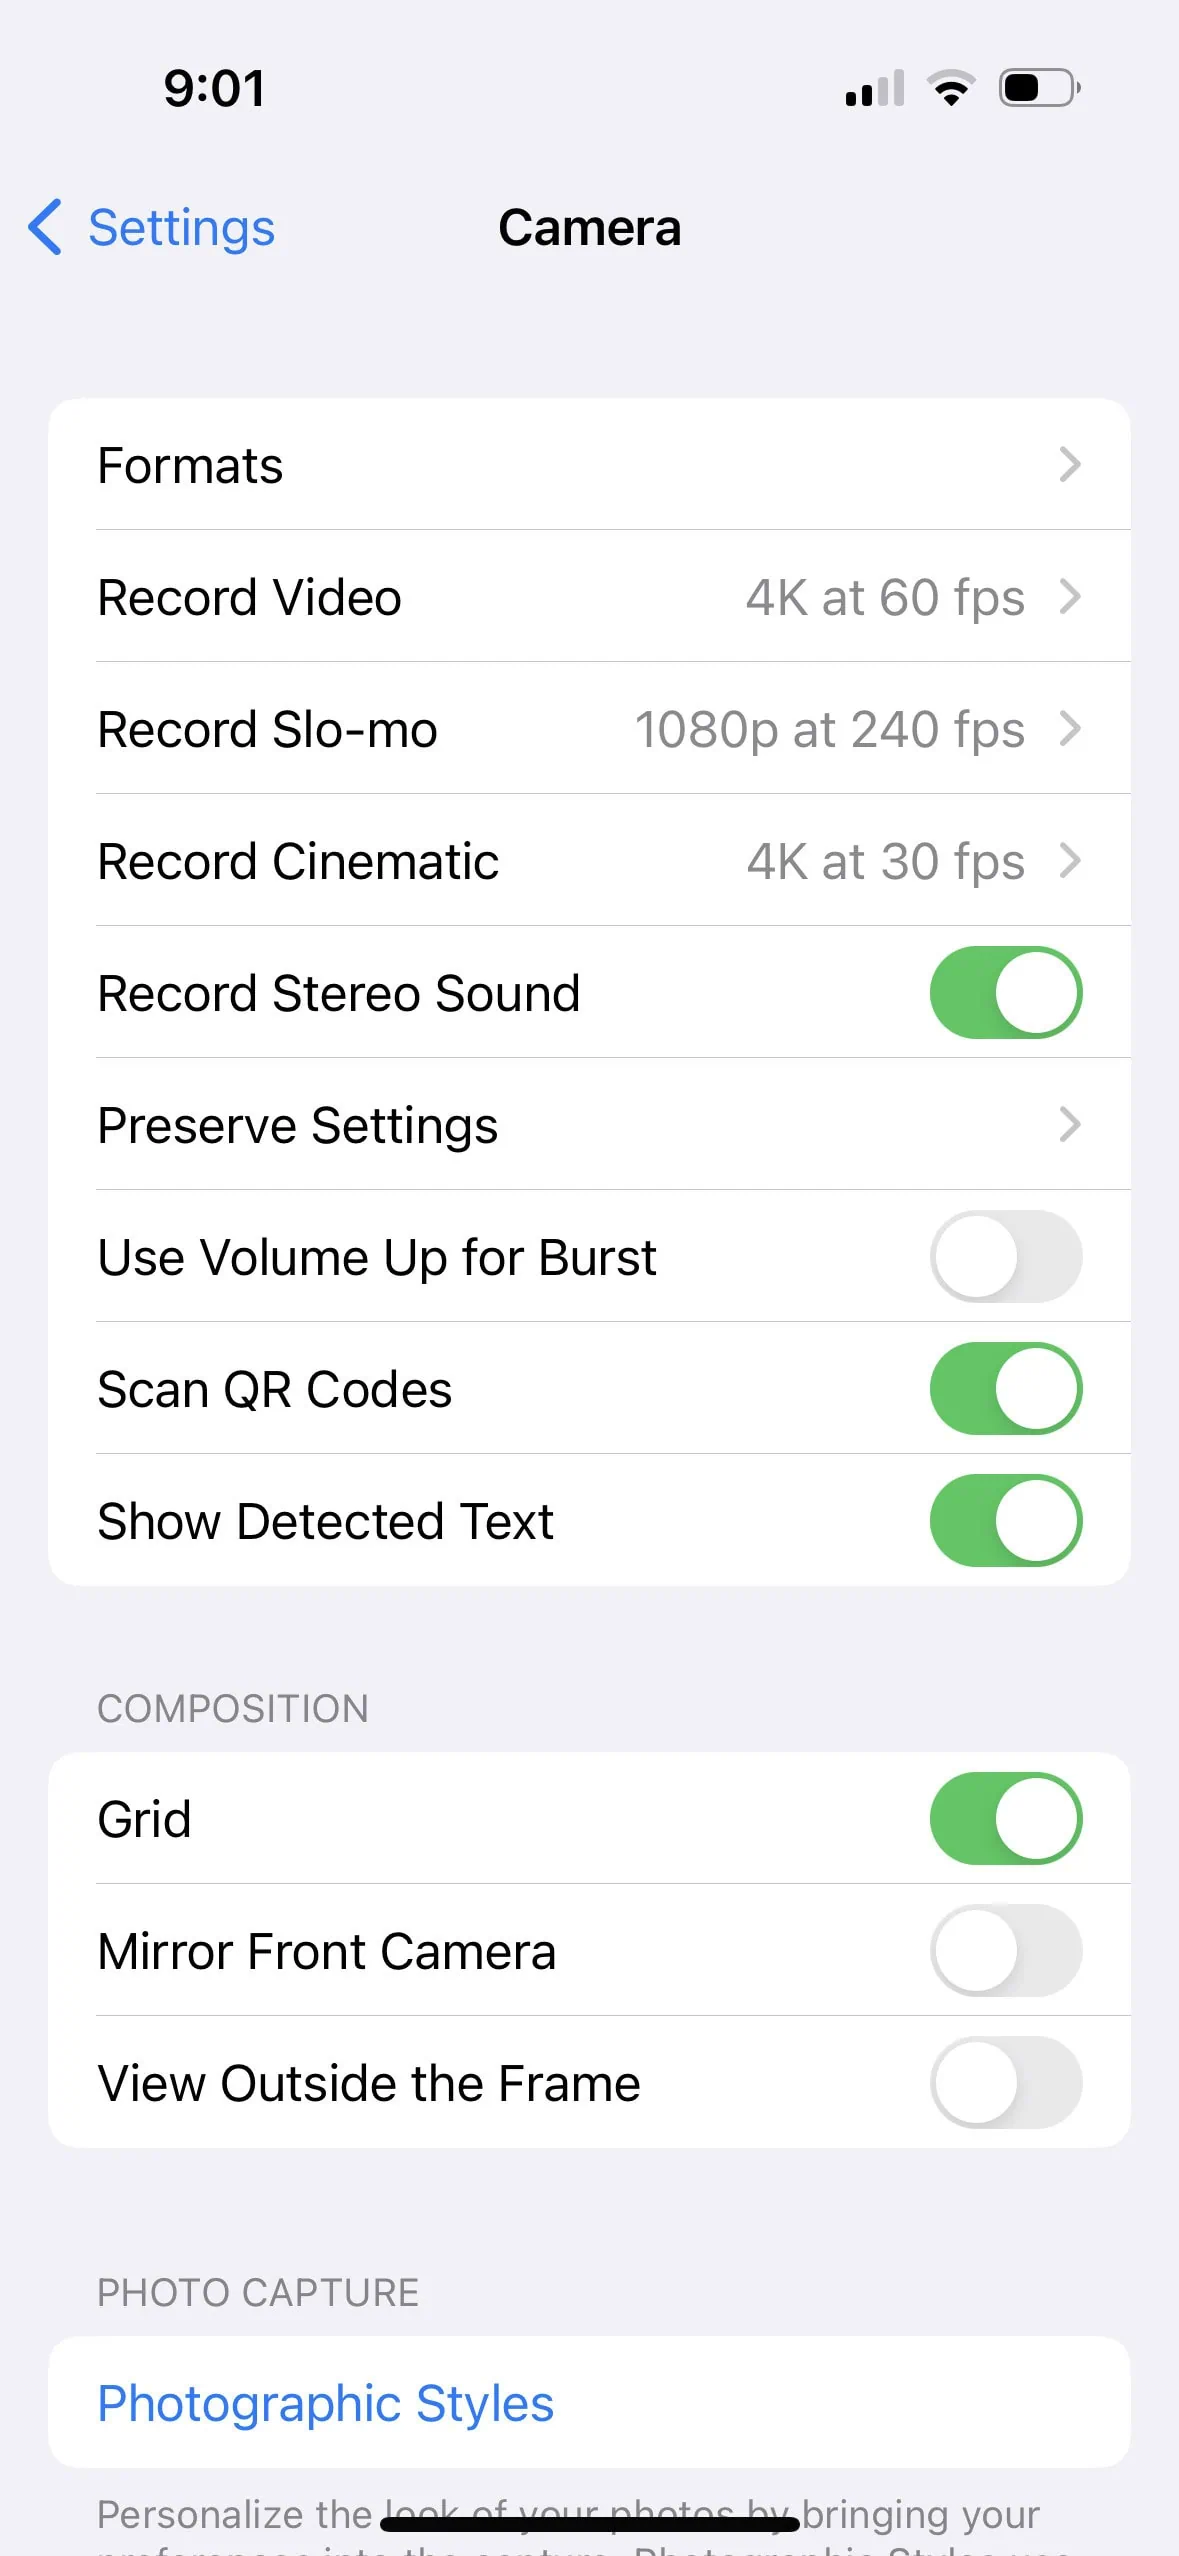
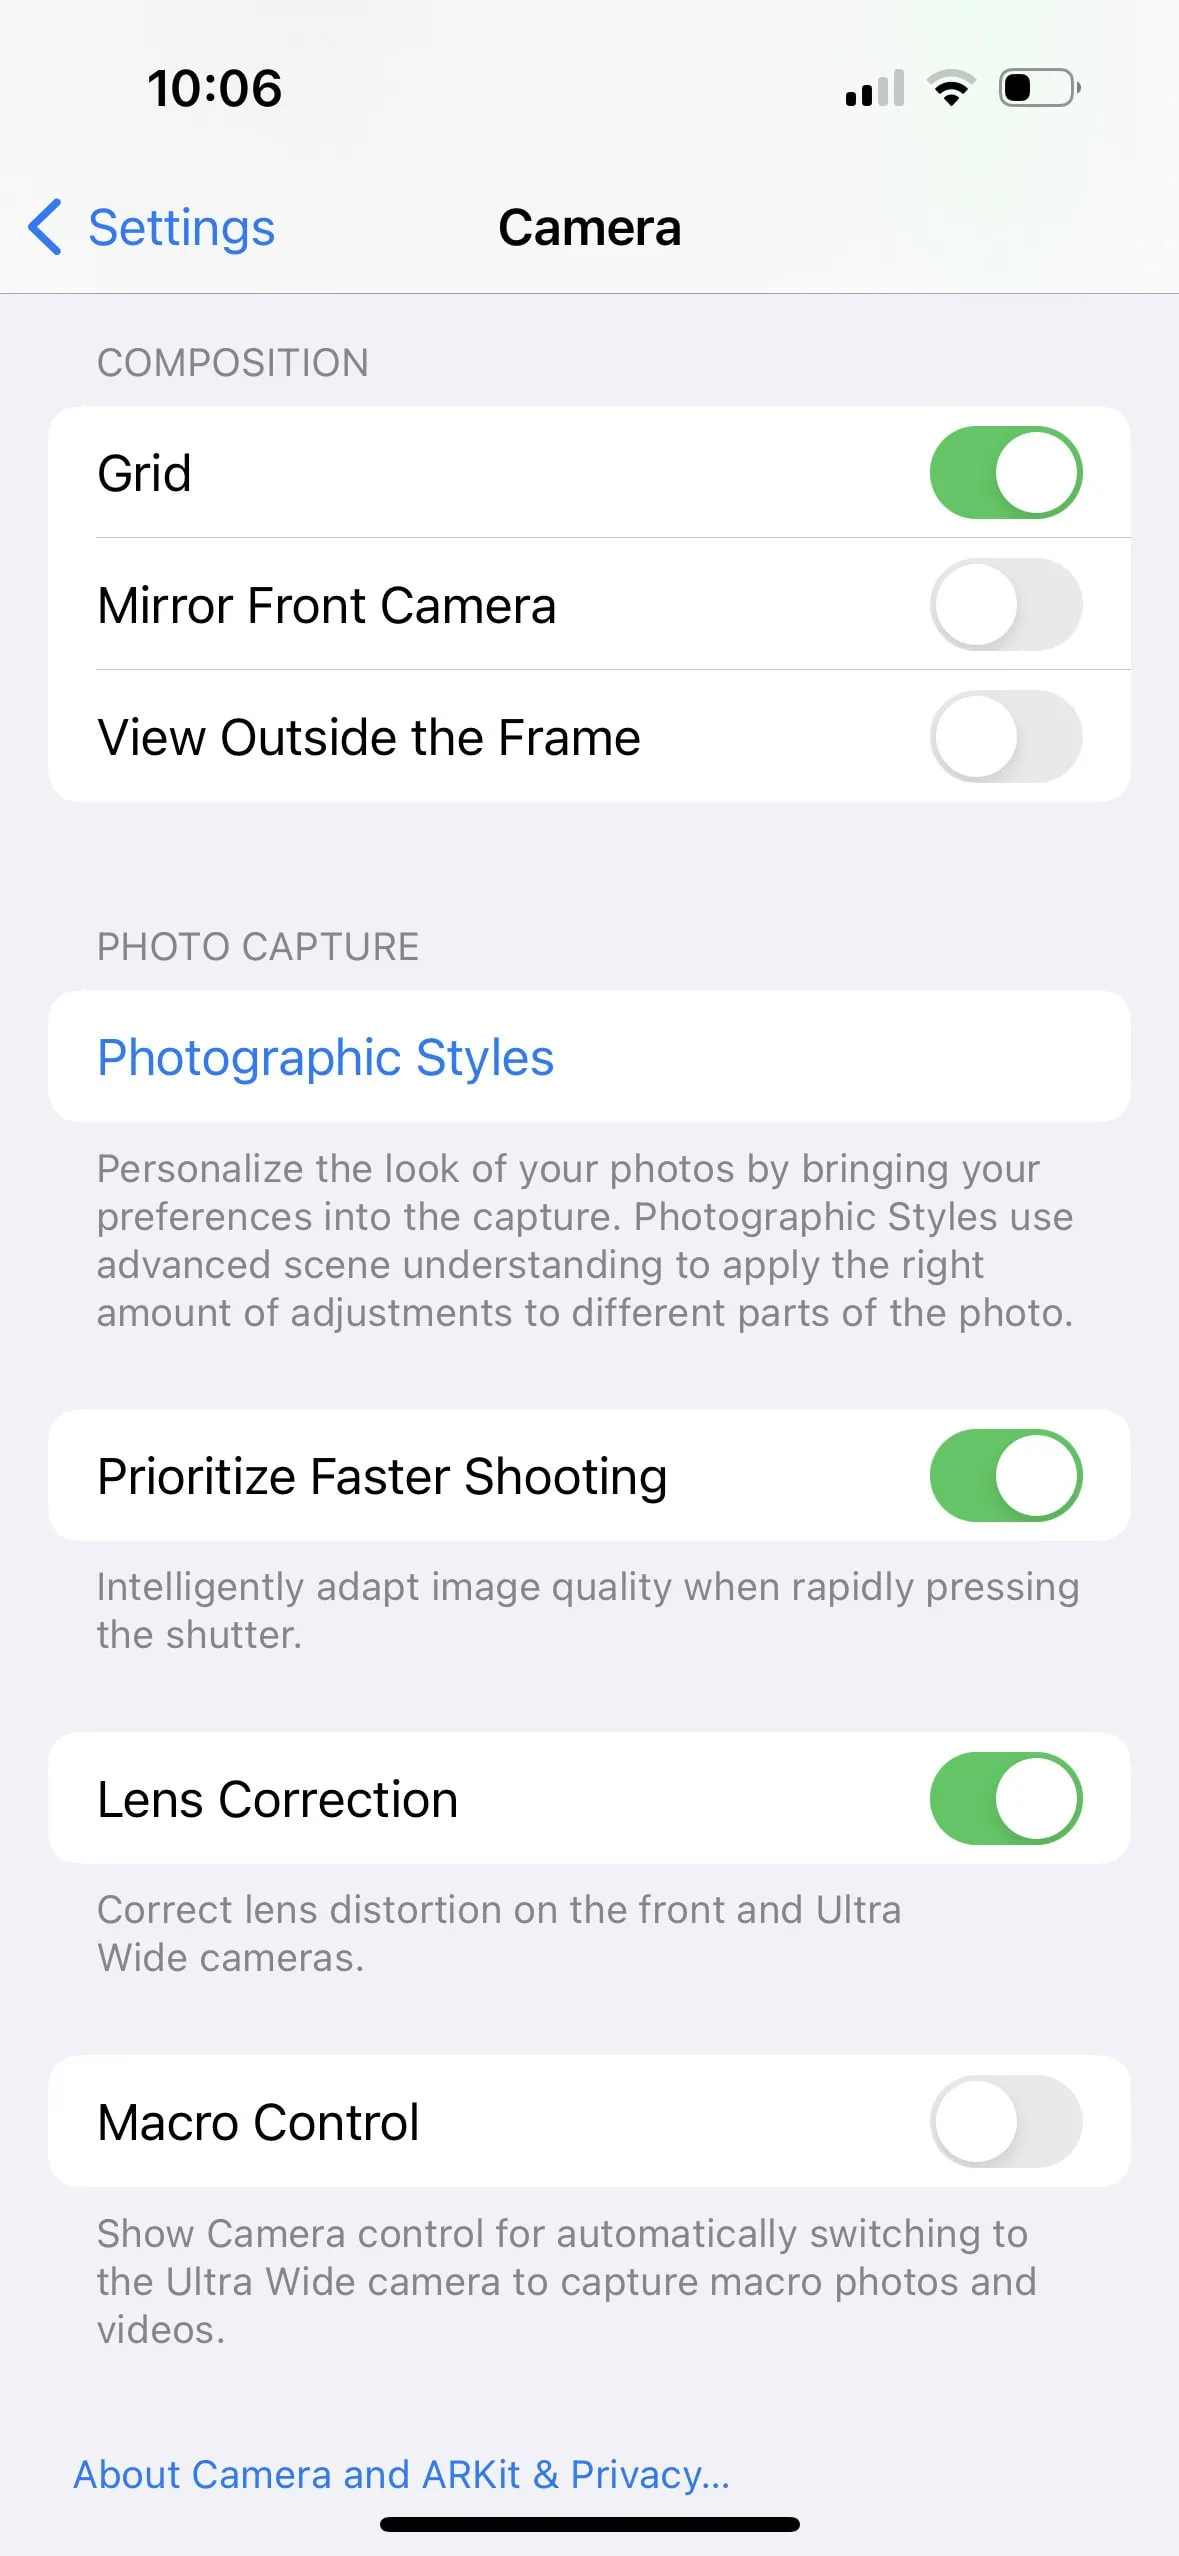

Settings > Camera > Turn Grid On and Turn Lens Correction On.
I like having a grid so that when I film, there are guiding lines. You typically want to try to keep the horizon level while filming, and the grid lines will help you do that. I also turn on lens correction for when I shoot in .5x mode.
Settings > Camera > Record Video > Turn Enhanced Stabilization on.
This will help minimize any shakiness from your hands or if you’re walking while filming.
Settings > Camera > Formats > Turn High Efficiency on
Cinematic video and videos at 4k at 60fps require High Efficiency to be on.
TIP: If you’re filming twinkle lights or see lights flickering in your videos, here’s how to fix it:
Camera Settings > Record Video > Turn “Show PAL formats” on > Turn on one of the PAL settings, preferably 4K PAL
*Unfortunately this is not a one-setting-fixes-all situation; you may need to try different settings before finding the correct one for whatever is flickering in your video!*
How to Upload High-Quality Reels to Instagram
Step 1: Film High-Quality Videos
If you really want to create the highest-quality reels possible, you can invest in a high-quality camera. However, the bigger the camera, the more you’ll need a gimbal like this one. (A gimbal is a device you put your camera into to stabilize your footage.)
As I mentioned earlier, I take 99% of videos on my phone and am perfectly pleased with the results! As long as you film with the right settings, you’ll get high-quality videos that are great to upload to Instagram Reels. (See the previous section for all the phone camera settings you should use!)
I will say, if you’re filming on an older iPhone, you’ll notice that the newer models have better filming capabilities. If you’re dedicated to having high-quality reels and are ready to invest in that, it might be time for a phone upgrade. I recently upgraded from my iPhone 12Pro to the iPhone 14Pro and have noticed a big difference! (Since it’s literally my job, this investment was a no-brainer.)
Step 2: Don’t Film in an App
When using your phone to film video, don’t film in an app. For example, you shouldn’t film your video directly on the Instagram app. Instagram gives you that option when you go to create a new reel or story. But instead, always film in your phone’s camera app.
Step 3: Toggle on the High-Quality Uploads Button on Instagram
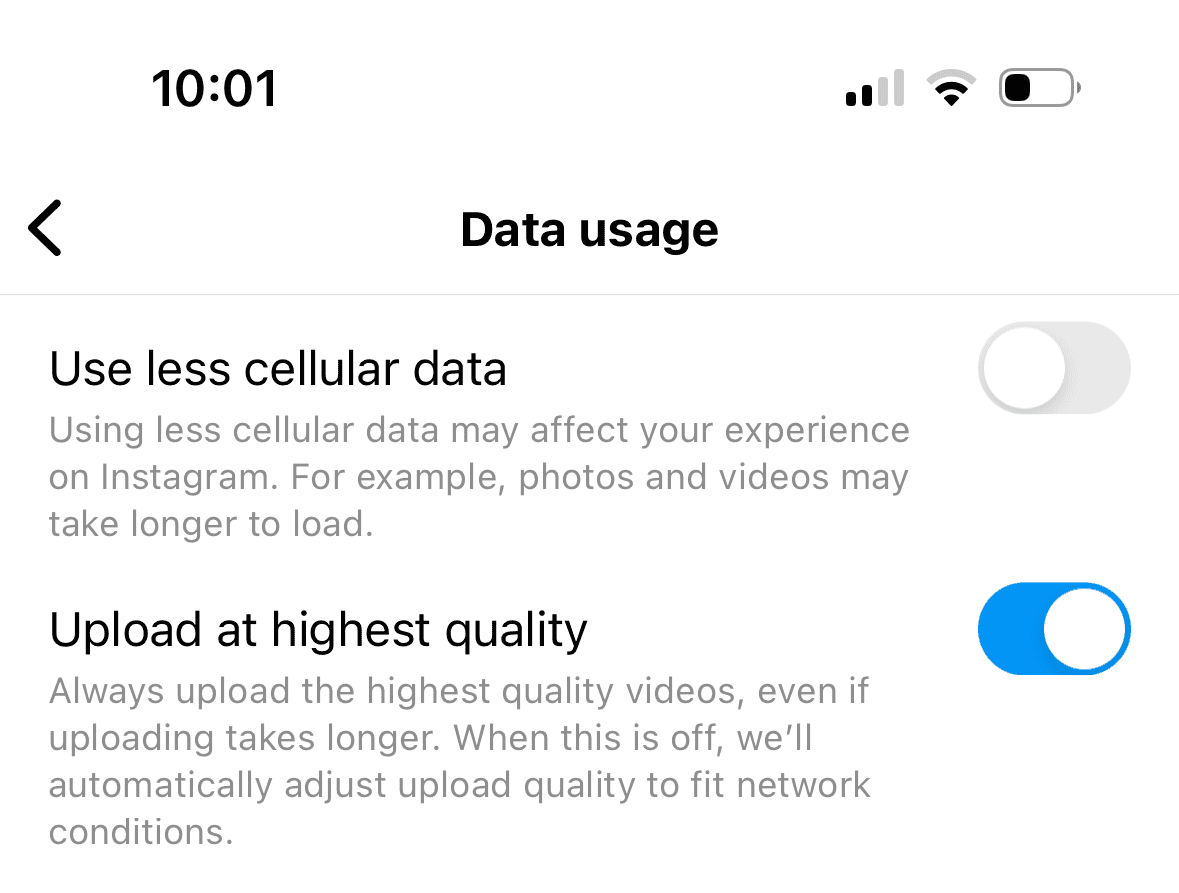
Here’s how to find the High-Quality Uploads setting in the Instagram app:
- Open Instagram
- Go to your profile
- Click the hamburger menu (3 lines) in the upper right-hand corner
- Select “Settings and privacy”
- Scroll down and select “Data usage and media quality”
- Make sure “Upload at highest quality” is toggled on (it should be blue)
It’s SO important to turn this setting on. Without it, if you upload high-quality videos, Instagram compresses them and they’ll look blurry or pixelated.
This was actually the setting that I was missing when I upgraded phones. I used to have it turned on, but I guess when I logged out of the Instagram app it reset this!
So I kept trying to upload different quality videos to see which would look best on Instagram, not realizing that I had this button off! But once this button is on, you should be able to upload high-quality videos successfully to Instagram Reels.
Step 4: Edit Your Reels in a Third-Party Video Editing App
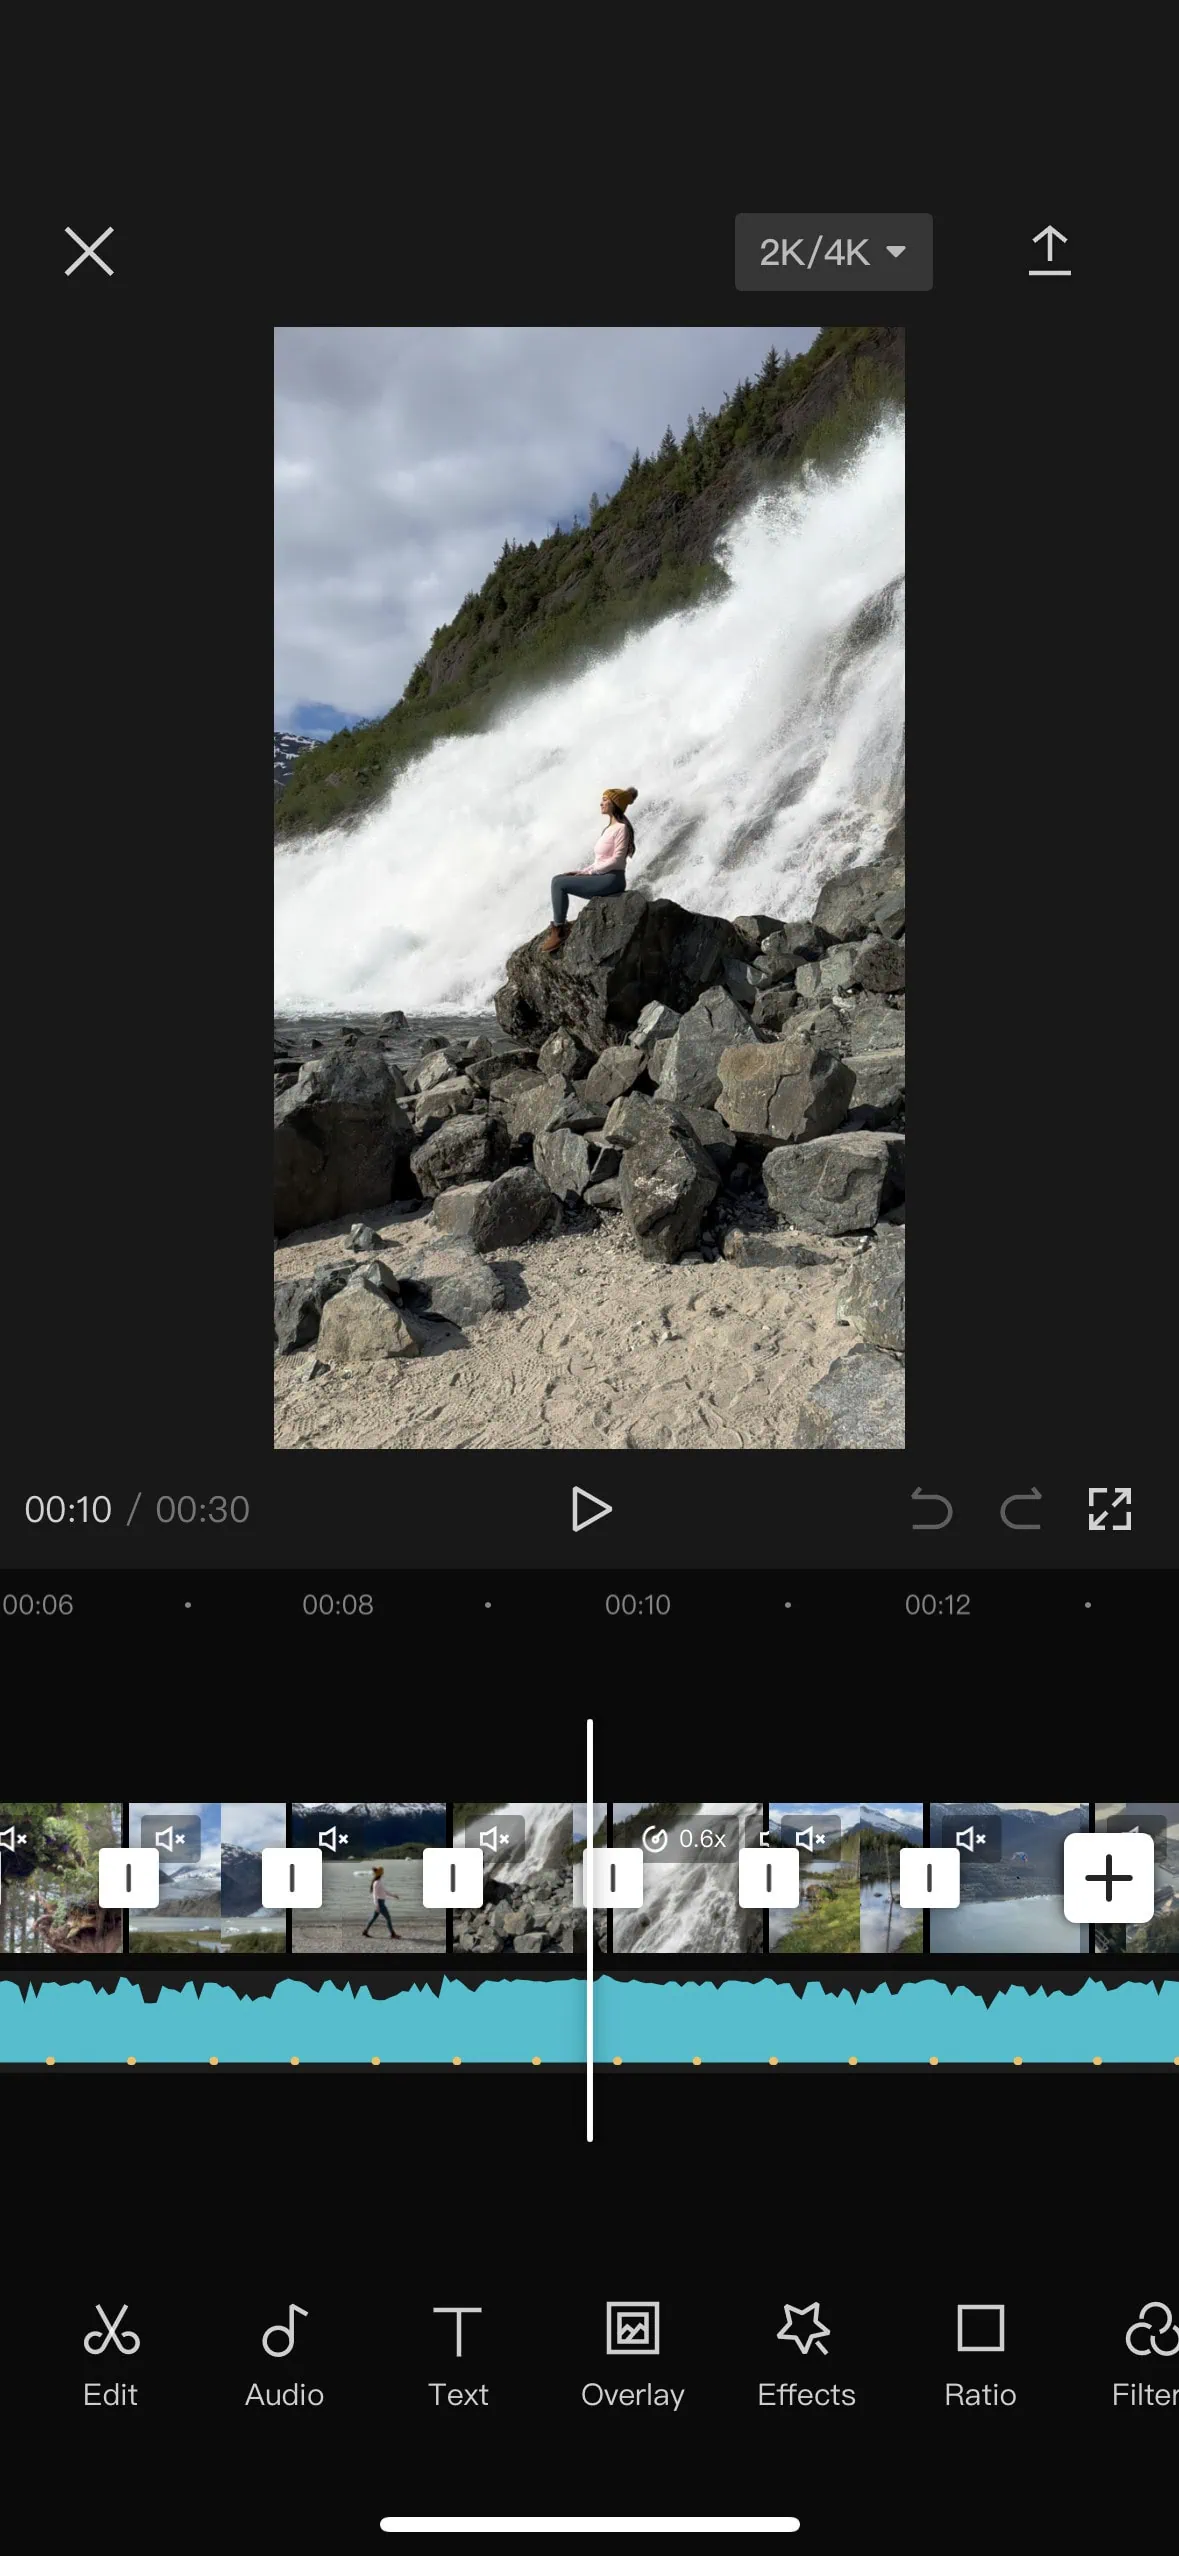
Third-party video apps, like the one I use, CapCut, allow you to do way more than Instagram’s built-in reel editor.
Sure, Instagram has been improving the tools they have, but they’re just not as user-friendly to me. There are also still so many more limits to Instagram’s app, like font choices, transitions, etc.
Not to mention the number of times Instagram has crashed while I’ve been editing a reel… truly so frustrating because then I have to start all over.
All that to say, third-party apps are your friend!
I use CapCut, but some other popular video editing apps on your phone include InShot, Splice, Videoshop, and Filmmaker Pro.
Something that I love about CapCut and InShot (other apps may have this too, these are just the ones I’ve used) is that you can adjust video coloring. Yes, your phone has the ability to make adjustments to videos. But these apps give you way more control and options! It’s almost like Adobe Lightroom for photos, but for your videos!
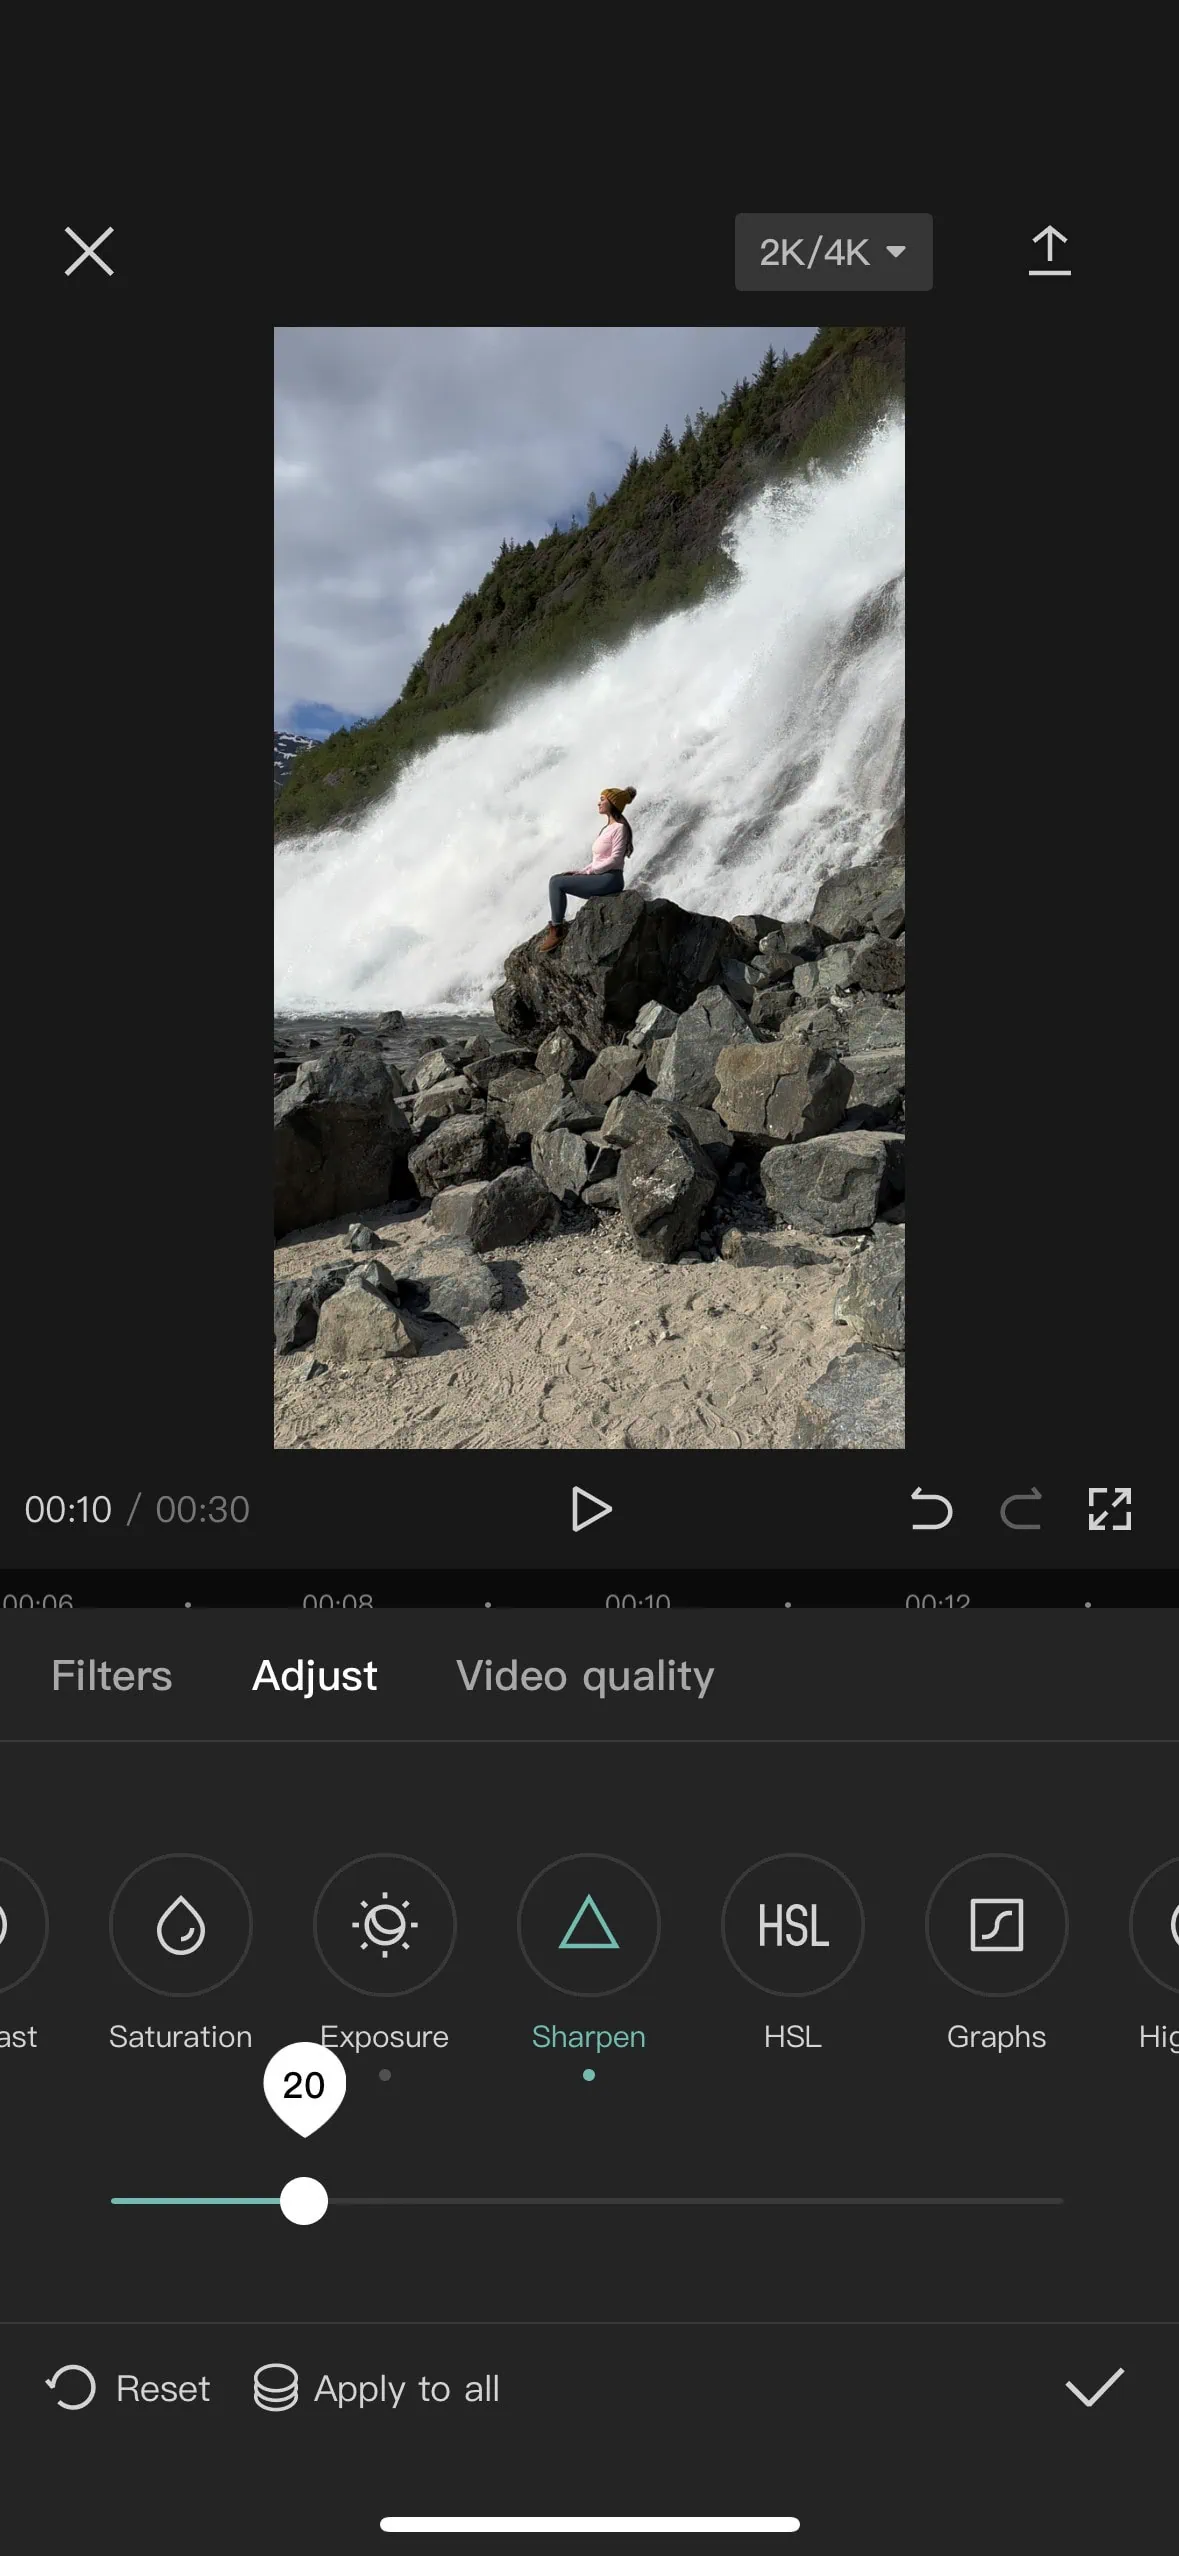
TIP: When editing your videos in third-party apps, increase sharpness by 20%. This will make your video sharper on Instagram, even if there is any compression!
Step 5: Use the Right Export Settings
Now that you’ve done steps 1 through 4, the next step is exporting with the right settings.
Filming in high quality means you can export in high quality! When you edit in a third-party video app, you’ll find different export settings you can select. You’ll want to use the highest quality settings, which I’ll cover in detail in this next section!
The Best Export Settings for Instagram Reels
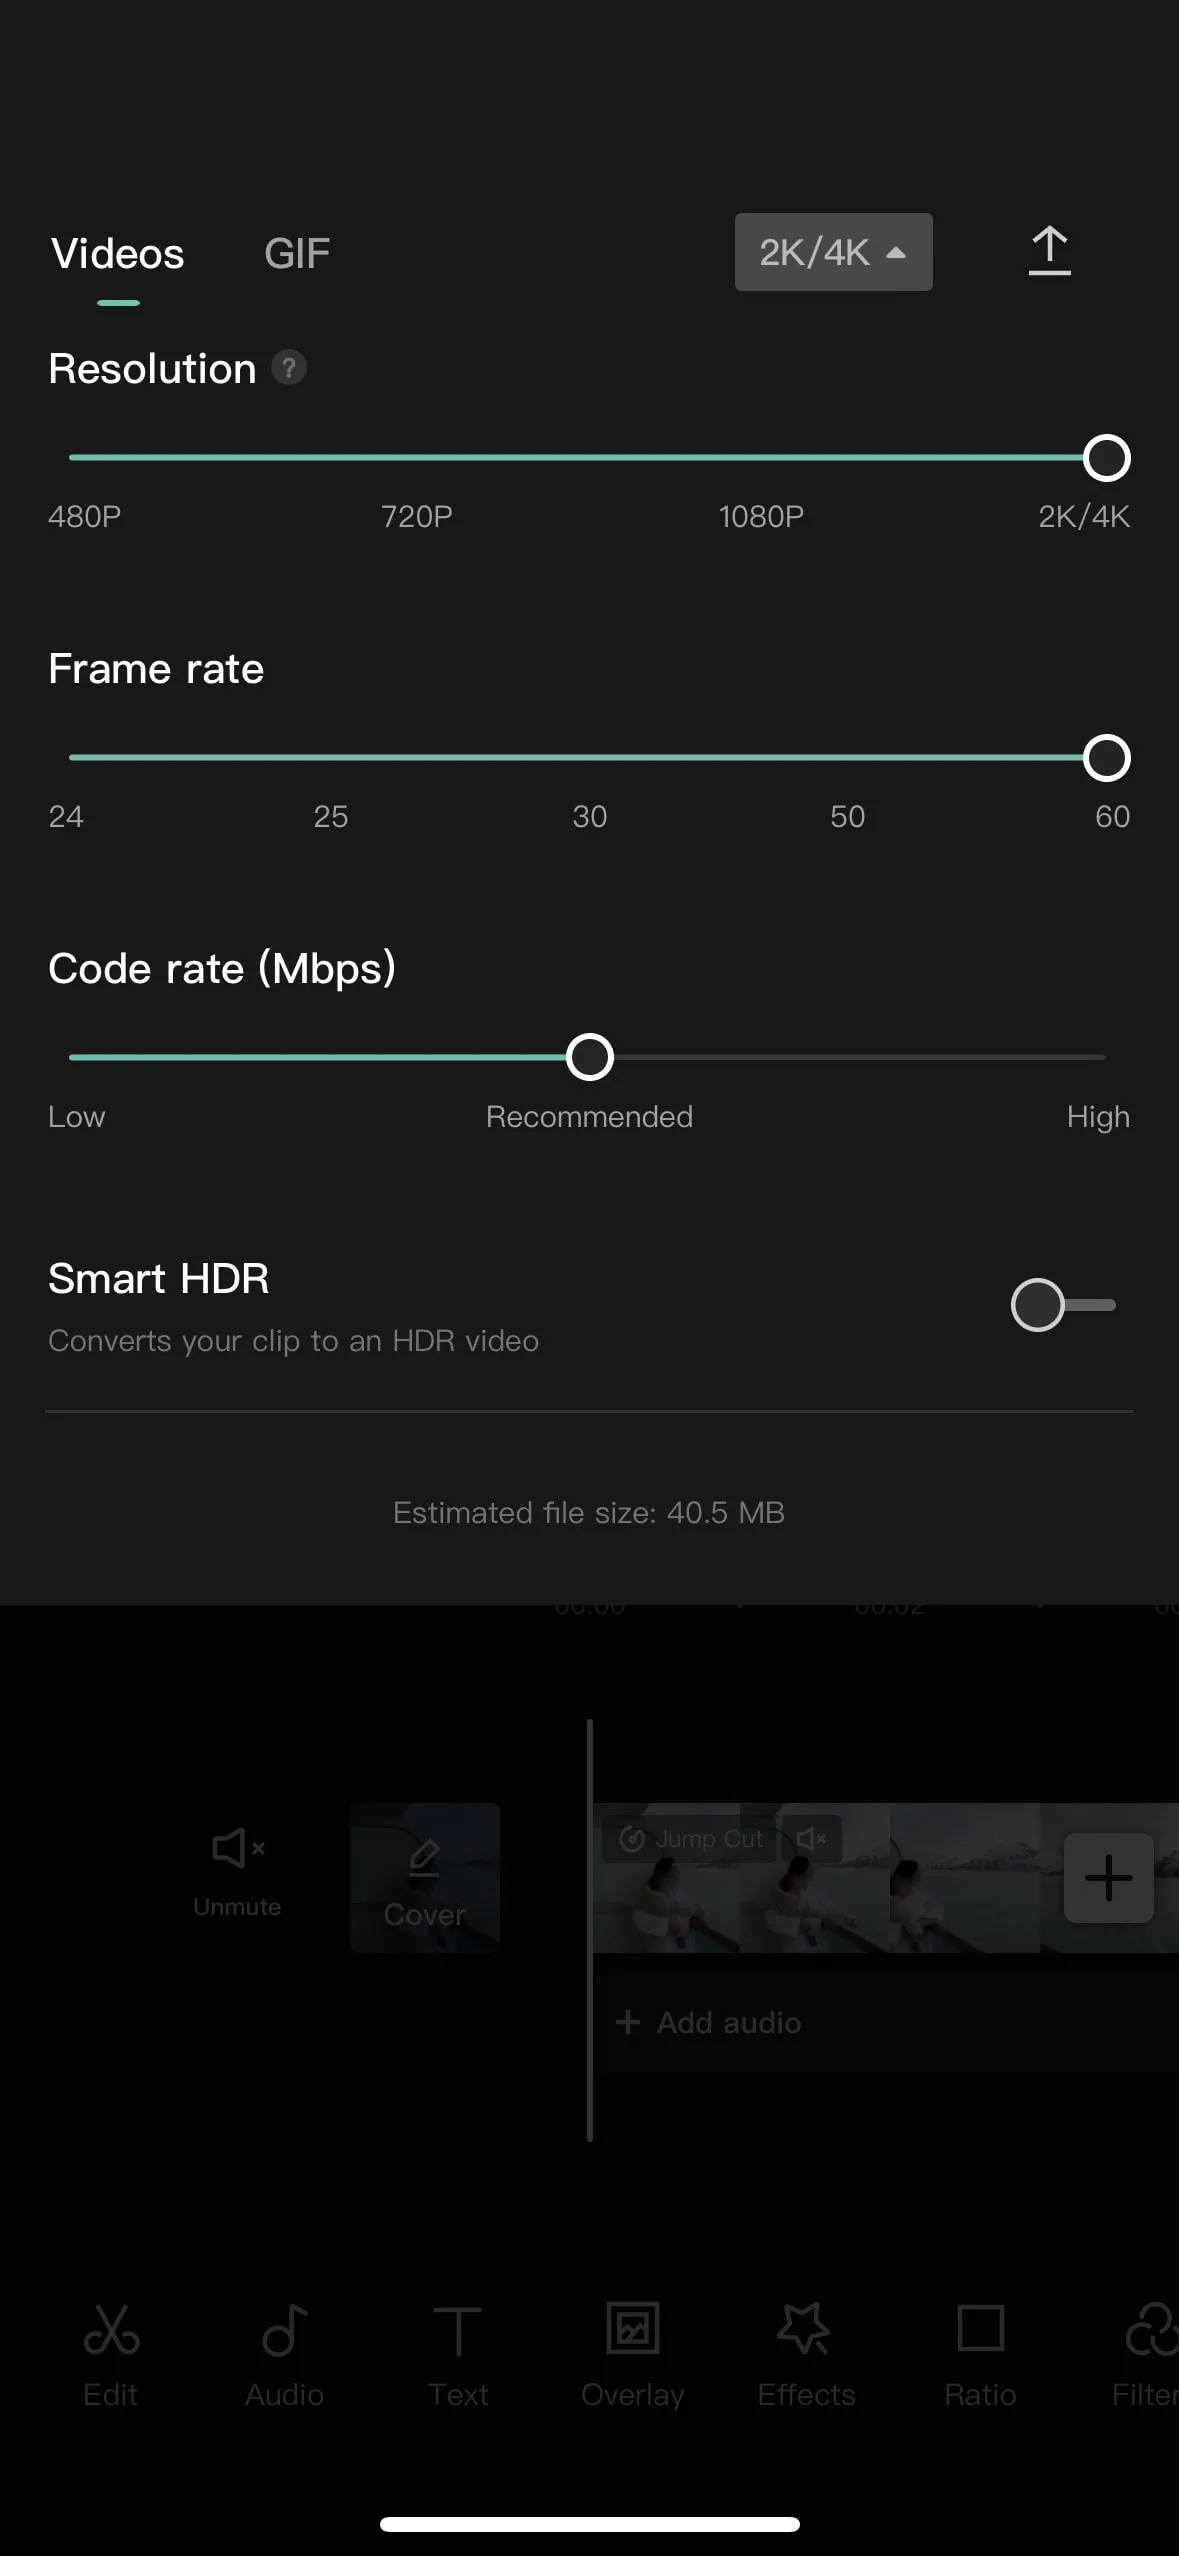
- Resolution: Instagram says that the ideal resolution for your reels is 1080 pixels x 1920 pixels. I export in 2k/4k on CapCut and don’t see any compression on Instagram. I have other travel blogger friends who constantly have viral reels that also export in 2k/4k, which supports my theory that this is best. However, if you still notice compression even after switching on “high-quality uploads” in your Instagram settings, it might mean that your phone, Wi-Fi, or another circumstance is preventing the full upload. In that case, try exporting at 1080.
- Frame rate: The recommended frame rate for reels is 30fps. However, I prefer to keep 60fps since that’s what I film in. While this increases the file size of reels, it shouldn’t be a problem with “high-quality uploads” turned on (and looks smoother).
- Bitrate: The bitrate is the amount of data that is used to encode your video. A higher bitrate will result in a higher quality video, but it will also increase the file size of your reels. A good bitrate for reels is between 5-15mbps. On CapCut, I select “recommended” under Code Rate)
- Video codec: The video codec is the algorithm used to encode your video. The most common video codec/format for reels is h.264. (This isn’t even an option in CapCut so I don’t worry about this one. However, other video apps may have options here!)
- Audio codec: Similarly, the audio codec is the algorithm used to encode your audio. The most common audio codec for Instagram reels is aac. (Once again, this isn’t an option in CapCut so I don’t worry about this one either.)
Additional Tips for Uploading High-Quality Reels
Here are some other very helpful tips for filming high-quality reels that have nothing to do with your phone settings!
- WIPE YOUR LENS: I can’t emphasize this enough! Use a clean rag, your shirt, a glasses cleaner wipe, or any soft lint-free material.
- Use built-in zoom levels: On phones with dual or triple cameras (look at your phone’s camera… if you see more than one circle, this is for you), don’t use “in-between” zoom levels. If your phone comes with .5x, 1x, 2x, and 3x, use those by tapping on the number. Don’t pinch and zoom; this will decrease your video quality.
- Decrease exposure: Lower the camera exposure just a bit by tapping on your screen and sliding your finger down. This will create a more dramatic film effect. You don’t want to lower the exposure too much, though!
- Use a tripod or phone gimbal: these will keep your camera steady and avoid shaky footage. Here’s the tripod I use (it compacts for travel) and the gimbal I recommend.
- Film in good lighting conditions: If possible, film in bright conditions so that your phone lens is taking in as many details as possible. Good lighting can make a big difference! If you’re filming indoors, try to film by a window or in a room that gets a lot of natural light.
In conclusion…
I hope these tips will make a big difference for your Instagram reels!
To summarize, at the bare minimum, you should wipe your lens before filming, turn on 4k video on your phone camera settings, and turn on “high-quality uploads” on Instagram. Export at the highest setting that you can, but experiment with different export settings to find what works best for your phone.
Now, the next step is figuring out how to create reels that do well on Instagram! As a rule of thumb, add music and text to make your reels engaging.
If you have any questions or more suggestions, leave a comment below!
I hope this helps!
Happy filming,
Jasmine







2 Responses
Do I add music for the video on CapCut or instagram? Which one will the algorithm boost more?
I usually add it on Instagram so that it doesn’t show up as “original audio” (unless it is your original audio). I hope that helps!