
Valley of Fire State Park is one of those places that simply takes your breath away. As soon as I entered the park, I realized this was no typical state park. In fact, I’m surprised it’s not a national park! With stunning vistas wherever you go, Valley of Fire is full of great photo spots. Here I’ll share the best ones!
Whether you’re visiting for a few hours or camping overnight, you should add these Valley of Fire photo spots to your list!
You can get a sense for some of the photo spots in this park from the video I made of my trip to nearby Las Vegas!
[If you don’t see a video player below, you may need to disable your ad blocker.]
First, let’s cover some of the basics to visiting Valley of Fire State Park. Then, I’ll list each of the 14 best Valley of Fire photo spots.
What is Valley of Fire known for?

With towering red rock mountains, ancient petroglyphs dating back over 2,000 years, and remarkable rock formations, Valley of Fire State Park is a must for nature and history lovers.
The combination of red Aztec sandstone and tan and gray limestone creates a striking, colorful palette here. As you drive down the park’s winding roads, incredible views greet you from all directions.
My husband and I were in town visiting the city of Las Vegas. But as nature lovers, we knew we’d want to add in the best nature spots around Vegas! We are grateful we included Valley of Fire State Park- it’s the coolest state park I’ve ever been to!
Visiting Valley of Fire

Here are some basics you should know if you’re visiting Valley of Fire State Park, from admission information to what you should bring.
How long does it take to visit Valley of Fire from Las Vegas?
It takes about an hour and twenty minutes to drive from Las Vegas to Valley of Fire, depending on where you’re coming from. Maps will show an hour-long drive, but that is just to the entrance. Most of the best Valley of Fire hikes and photo spots require an additional 15-minute drive past the entrance.
Admission Information
The park is open daily from sunrise to sunset. After sunset, only campers are permitted in the park.
It costs $10 per in-state vehicle and $15 for out-of-state vehicles. If you visit for sunrise before they open, you’ll need to fill out one of their designated envelopes, seal your cash inside, and leave it in a dropbox. There’s a portion you tear off and hang on your mirror as proof of payment.
Camping costs $20 per Nevada vehicle ($25 for out-of-state vehicles), per night. There’s an additional $10 for sites with utility hookups.
The visitor’s center is open from 8:30-4:30.
You can find full admission information on the park’s website here.
Valley of Fire Drone Policy
Unfortunately, drones are not permitted at the Valley of Fire State Park.
What to Wear to Valley of Fire State Park
Since you’ll be hiking, you’ll want to wear some practical shoes. Keep in mind that some of these photo spots involve sandy paths. I actually wore sandals the whole time we were at Valley of Fire (hiked in them for about 4 miles total), and I was totally fine.
What to Bring to Valley of Fire State Park
- The number one thing to bring to Valley of Fire State Park is water, water, and more water!
- Sunscreen
- A hat and/or sunglasses
- Your camera (here’s exactly what’s in my camera bag!)
- A zoom lens (here’s the one I use)
- Food and snacks if you’re planning on staying more than a few hours
- Make sure you fill up your tank before entering the park if you plan on staying more than a day here!
When should you visit Valley of Fire?
Time of year:
You can visit year round, but it can get extremely and dangerously hot in the summer. If you do visit in the summer, visit early in the morning before the daytime heat really sinks in.
If you visit in the winter, bring a warm jacket and plenty of layers! You’d be surprised at just how cold Nevada can get in the winter.
Additionally, if there are impending rains, flooding can occur very quickly, so avoid visiting in potentially bad weather. Safety first!
Time of day:
For photography, the best time to visit Valley of Fire State Park is in the morning. Specifically, you’ll want to arrive at sunrise if you’re up for it!
While it’s not necessary per se, it will help ensure there are not many people in your photos. You’ll get most hikes all to yourself!
If you’re not an early riser, you can still get great shots without many people in them in the morning before 10am.
Or, visit on a weekday to minimize crowds.
We visited right after sunrise at 6:30 on a Sunday morning and stayed until around 10:30am. That four hour chunk of time was enough to explore spots 1-10 on this list of photo spots!
Let’s get into it- here are the best photo spots and most Instagrammable places at Valley of Fire State Park!
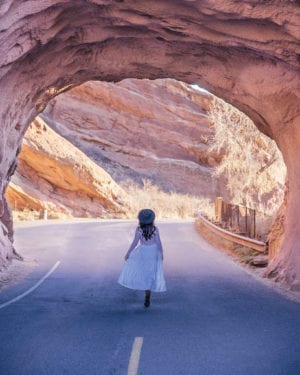
1. Mouse Tank Road

This location on Mouse Tank Road is one of my favorite Valley of Fire photo spots. I also put this spot first because if you’re visiting in the morning, you’ll want to make this your first stop. The earlier in the day, the easier this photo will be.
I’ve listed the exact location on the map at the bottom of this post, but it’s basically right before the Rainbow Vista trailhead.
I hope this goes without saying, but you should keep an eye on your surroundings and watch out for cars! (That’s the main reason why this spot is best in the early morning… the fewer cars the better!)
Photo tip: If you’re shooting in the early morning, underexpose your photo to make sure that the spots with the sun on them don’t get washed out! When editing, you can lighten the shadows and blacks and then dehaze to fix the lighting.
2. The Road From Above

There is a large rock/boulder you can climb at this spot, with space for a few cars right next to it. You’ll see what the boulder looks like in the next spot on this list.
Capturing Mouse Tank Road from above allows you to see more of the road in your photo. It looks like a drone shot, but it’s just because the photographer is elevated for the photo.
We took this spot with my 24-120mm zoom lens at full zoom. (I was very, very far away from Harrison here).
3. The Boulder + Road View

Here you can see the boulder that we shot the last image from. But for this shot, you’ll want to move back on the rock while zooming in a bit to capture the mountains and road as well.
On a Sunday morning at sunrise, we shared this spot with three other groups getting photos here, so be mentally prepared for that.
Now it’s time to drive further down Mouse Tank Road to the next photo spot: the famous Fire Wave!
4. The Fire Wave

To reach the Fire Wave, you’ll pull into Parking Lot #3 on Mouse Tank Road. Cross the road and embark on the 1.5-mile round trip (out-and-back) hike to the Fire Wave. Alternatively, you can also hike to the Fire Wave from the Pastel Pink Canyon, which is later on this list.
Since our goal was to have as few people as possible in our photos, we visited The Fire Wave right after Mouse Tank Road, and did the out-and-back hike.
It took us about 10 minutes to walk to the Fire Wave.
When we arrived at the Fire Wave at 7am, there was just one other couple here finishing their photos. Then we had it all to ourselves! Though the Fire Wave looks pretty large here, it takes less than 30 seconds to walk to the top (I timed it!).
The Wave is remarkable. It is pinkish-orange in hue and zebra-striped in pattern! It’s a nature photographer’s dream!
Photo tip: have your photographer take the photo near the bottom of the wave to get a cooler angle of the wave (ie. the first photo on this blog post). Harrison got the above photo of me from higher up on the rock.
5. The Slot Canyon

Now it’s time for one of the best Valley of Fire photo spots: the stunning slot canyon.
You’ll find it on the 1.1 mile White Domes Loop. To get to the White Domes Trail, you’ll drive down Mouse Tank Road to the very end. It’ll dead end into the parking lot for this trail.
Tip: do the trail clockwise to avoid having to climb a steep hill. Instead, you’ll go down it, so be careful not to slip as you go down. Also, note that this is a very sandy trail.
Going clockwise from the parking lot, after you reach the old movie set, keep following the trail markers and they’ll bring you to the very cool slot canyon. I’d say it’s about a third of the way in. Some parts of the slot canyon get just a few feet wide, which makes for epic photos here!
6. White Domes Trail Slot Canyon Overlook

After you exit the slot canyon (still going clockwise around), walk for a bit and keep an eye out for a very large boulder to your left.
If you climb that boulder, you’ll reach the spot in the photo above, which I have unofficially named the White Domes Trail Slot Canyon Overlook. (You won’t find it in Google maps).
Be careful as you climb it- I did it barefoot and there were a few sharp(ish) rocks I had to watch out for.
7. White Domes Trail View

Keep on heading down the White Domes Trail and you’ll spot this epic view! Bear in mind that we got this with our 24-120mm lens at full zoom, which allows for a lot of lens compression (ie. making the mountains in the distance larger than they look in real life).
Photo tip: These aren’t the only photo-worthy spots on the White Domes Loop! You’ll find a small arch, cool rocks with holes in them, and more. Basically, keep your eyes peeled for more epic photo spots as you’re hiking- you’re bound to find some!
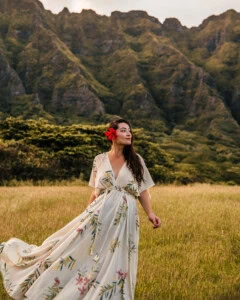
8. Pink Pastel Canyon

Heading back down Mouse Tank Road, plug “Pastel (Pink) Canyon” into your Google maps. Even though this is a lesser-known trail, it’ll show up as a point on Google maps. (At the time of writing, it’s not in Apple maps.)
You’ll see a parking area on the side of the road with enough room for two or three cars. That’s where you’ll want to park. If you’re on Mouse Tank Road facing the park entrance, the pastel pink canyon is on your left.
Tip: We explored this area thoroughly in search of pink before realizing that the pastel pink rocks aren’t completely pink- they’re more tan. But that makes them no less cool!
The whole “hike” is really just a short walk unless you want to continue on to the Fire Wave. But if you do what we did and park off the side of the road, you’ll only be walking for 5 minutes or so. (Which is how I was in a dress for these photos- it was a very easy walk!)
I particularly love how smooth the rocks are! You can also climb them and see what they look like from above- but I think the best shot here is the one we got since you’re surrounded by cool, wavy canyon walls.
9. Rainbow Vista

Also on Mouse Tank Road, you’ll find Rainbow Vista. You’ll see an incredible view right at the trailhead, but you can also do a one-mile roundtrip hike here. On the hike, you’ll have great views of Fire Canyon, but if you’re short on time, a photo at the trailhead will suffice.
Alright, we’ve covered all of the best Valley of Fire photo spots along Mouse Tank Road. The rest of the spots on this list are elsewhere in the park; let’s get to it!
10. Balanced Rock

The balanced rock speaks for itself! How neat is it that this rock has just balanced perfectly on the other rock for ages?
This is the view from White Domes Road, which I think is cooler than the trail view. But you can also choose to hike/walk along the trail to Balanced Rock to see it up close.
When facing the visitor’s center, you’ll see the trail right next to it on the left. The whole hike a very easy .25-mile out-and-back trail that will take about 15 minutes total.
I hope this goes without saying, but don’t climb on this rock.
Photo tip: If you hike to the rock, when you get back on the road, don’t forget to turn around and look at it from White Domes Road! You’ll see how it is way more precariously balanced than it looks from the other side.
11. Elephant Rock

Yup, Valley of Fire has an elephant-shaped rock! No wonder it’s one of the best Valley of Fire photo spots! How neat is its “trunk,” and the adorable way it is sitting? (Or, at least, I think it is sitting?)
Elephant Rock is located further down Valley of Fire Highway past Mouse Tank Road (further if you’re entering the park from Las Vegas, very close to the park’s East entrance).
You can see the rock from the road, and an easy .3-mile hike will bring you here.
Though you can climb the rocks around it, make sure not to touch the (relatively) delicate elephant!
12. Seven Sisters

You’ll find Seven Sisters on a quick pull-off on the Valley of Fire Highway. These are seven sandstone rock formations that are the result of erosion.
If you’re heading east, they’re located on your left just past where Mouse Tank Road intersects with Valley of Fire Highway. You’ll see signs directing you to the unique rocks and a small parking lot (the parking lot will be on your right if you’re driving east).
You can’t miss these as you’re driving by, they’re just on the side of the Valley of Fire Highway.
13. Arch Rock

You can see this neat rock formation directly from Scenic Loop Road. It doesn’t require a hike to get to- just a short walk to see it up close.
Alternatively, or in addition, visit the Fire Cave, which is also on the Scenic Loop Road. (Its other name is Windstone Arch, and it’s especially great if you want to get out of the sun for a little bit.)
Note that no climbing is allowed on this fragile rock. (With time, this arch will actually crumble from its own weight!)
14. The Beehives

Last but not least, the beehives are located right along Valley of Fire Highway. They’re basically the first major point of interest that you’ll see when you enter the park from Las Vegas/the west.
Here, you’ll find geologic cross-bedding in this sandstone that has caused each newly deposited layer to shift in a different direction. The result: giant beehive-looking rocks!
You’ll see signs showing you where the Beehives are, so you can’t miss them! They’re across the road from Atlatl Rock.
Map of Valley of Fire Photo Spots
Here’s a map of each of these photo spots! You can open the map and save it to your own maps to refer back to later.
I also recommend downloading offline maps for the state park on Google maps, since you might not have service in some parts of the park.
In conclusion…

There you have it! The best photo spots in Valley of Fire State Park!
If you’ve only got a short time at the park, my favorite spots are Mouse Tank Road, the Fire Wave, Pastel Pink Canyon, and the Slot Canyon on the White Domes Loop. (The above photo is from the hike to the Fire Wave).
Which of these spots are you most excited to visit?
And if you are looking for photo spots to up your Instagram game, here are some more posts you might enjoy:
- 31 Ways to Improve Your Instagram
- How to Pose for Photos
- 15 Tips on How to Take the Perfect Instagram Photo
Safe travels!
Jasmine
PS. If you found this post helpful, please share it to Pinterest! You can use either image below for easy pinning!


10 Responses
Jasmine, you’ve written and documented a very helpful article here, on the Valley of Fire. I’m a 50 year resident of Las Vegas and have been there many times. When I saw your hint of Careful Not to Slip on the White Domes trail, I had to laugh. This past Monday I slipped off of a ledge and fell about 10 feet. I grabbed a Mesquite branch to break my fall but the thorns tore me up pretty good. My camera and lens got a few scratches as well, but no major injuries to either the equipment or myself. I’m definitely lucky. I am going back this Monday to camp and shoot the Milky ????Way. Thanks and happy shooting.
Oh wow! 10 feet is terrifying! I’m so glad you and your equipment were okay! My version of that horror story was slipping in the rain in St Lucia a couple of months ago and cracking my camera in 3 places!! But I was totally fine and thankfully my camera and lens are all fixed now! Anyway thanks for the kind words about the article and have fun shooting the Milky Way there! Bet that will be beyond breathtaking!!
What does the sun look like on mouse tank road and arch rock at about 7pm? Thinking to do some wedding photos.
Hi Lisa! Sunset has great lighting there, but sunrise has fewer cars on the road!
Thank you Jasmine for sharing your experience. This is exactly what I was looking for. Love all the details, descriptions and guidance to hit the main spot on a short time. I will be visiting Las Vegas in a few weeks and want to take my sisters for this breathtaking adventure. I don’t like to do too much hiking this is why your description is perfect. Now I will search for more blogs for the other parks and Cayon.
Hi Wanda! I’m so glad this was helpful!! You are going to love it there- it truly is one of the prettiest state parks I’ve ever been to!!
Thank you for such an in depth guide! You’re photos are gorgeous and has me pumped for my own trip soon!! ❤
Thank you so much Linh! I’m glad to hear it!!
real sense of the word- ‘wonderful’
photographs and gyuidance both. I was wondering what camera did you use to capture the photos ?
Thank you very much for this in depth guide! I am coming to Las Vegas next week and planning to propose to my girlfriend in this area… not sure which exact spot yet but this definitely helps narrow it down. Thank you so much !!